
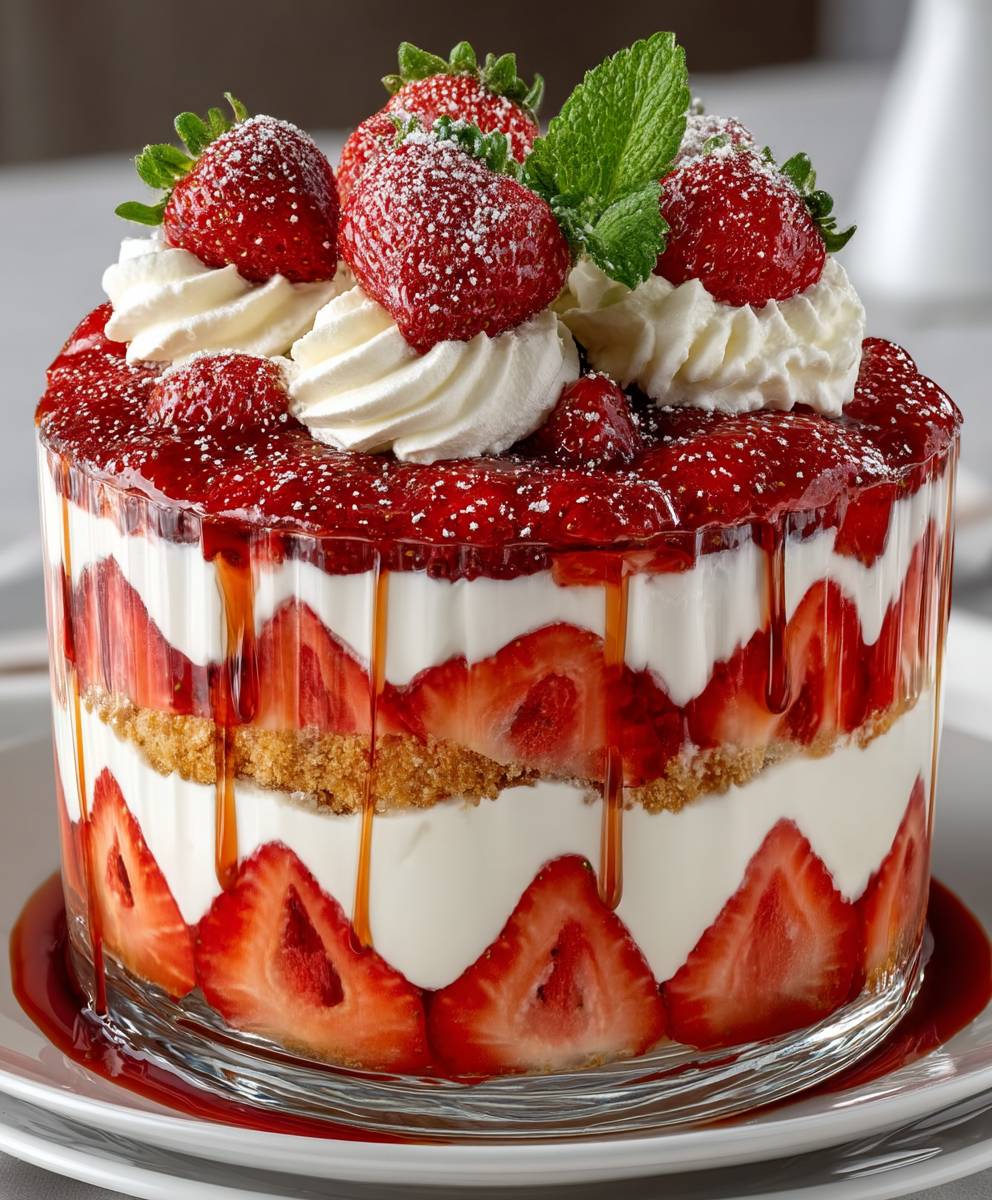
Strawberry Trifle: a symphony of textures and flavors that dances on your palate! Imagine layers of fluffy sponge cake soaked in sweet sherry, luscious custard, fresh strawberries bursting with summer sunshine, and a cloud of whipped cream, all culminating in a dessert that’s as visually stunning as it is delicious. Have I got your attention? This isn’t just a dessert; it’s an experience.
The history of trifle stretches back centuries, with early versions appearing in English cookbooks as far back as the 16th century. Over time, it has evolved from a simple cream-based dessert to the layered masterpiece we know and love today. While variations exist across the globe, the essence remains the same: a celebration of indulgence and simple pleasures.
Why is Strawberry Trifle such a beloved dessert? It’s the perfect combination of textures – the soft sponge, the creamy custard, the juicy strawberries, and the light whipped cream create a delightful contrast that keeps you coming back for more. Plus, it’s incredibly versatile! You can adapt the recipe to your liking, using different fruits, liqueurs, or even adding a layer of chocolate. But for me, nothing beats the classic combination of strawberries and cream. It’s also a fantastic make-ahead dessert, perfect for entertaining or simply treating yourself. So, are you ready to create your own stunning Strawberry Trifle? Let’s get started!

Ingredients:
- For the Sponge Cake:
- 225g (8oz) self-raising flour
- 225g (8oz) caster sugar
- 225g (8oz) softened butter
- 4 large eggs
- 1 tsp vanilla extract
- Pinch of salt
- For the Strawberry Jelly:
- 2 packets (approximately 135g/4.7oz each) strawberry jelly crystals
- 1 pint (570ml) boiling water
- 1 pint (570ml) cold water
- Optional: Fresh strawberries, sliced, for adding to the jelly
- For the Custard:
- 600ml (2 1/2 cups) ready-made fresh custard (or homemade, see instructions below)
- For the Strawberries:
- 500g (1.1 lbs) fresh strawberries, hulled and halved or quartered depending on size
- 2 tbsp caster sugar (optional, for macerating the strawberries)
- For the Topping:
- 300ml (1 1/4 cups) double cream (heavy cream)
- 2 tbsp icing sugar
- 1 tsp vanilla extract
- Optional: Fresh strawberries, for decoration
- Optional: Flaked almonds, toasted, for decoration
- Optional: Sherry or Fruit Juice
- 50-100ml (1/4 – 1/2 cup) Sherry (sweet sherry like cream sherry is best) or Strawberry Juice
Making the Sponge Cake
Let’s start with the sponge cake. You can use a store-bought sponge cake to save time, but I find that homemade always tastes better! This recipe is super simple and creates a lovely, light sponge.
- Preheat the oven: Preheat your oven to 180°C (350°F/Gas Mark 4). Grease and line a 20cm (8 inch) round cake tin with baking parchment. This will prevent the cake from sticking.
- Cream the butter and sugar: In a large bowl, cream together the softened butter and caster sugar until light and fluffy. This is a crucial step for a light sponge, so take your time and use an electric mixer if you have one.
- Beat in the eggs: Gradually beat in the eggs, one at a time, ensuring each egg is fully incorporated before adding the next. If the mixture starts to curdle, add a spoonful of flour from the measured amount.
- Add the vanilla extract: Stir in the vanilla extract.
- Fold in the flour: Gently fold in the self-raising flour and salt until just combined. Be careful not to overmix, as this can result in a tough cake.
- Pour into the tin: Pour the batter into the prepared cake tin and spread evenly.
- Bake: Bake for 25-30 minutes, or until a skewer inserted into the center comes out clean.
- Cool: Let the cake cool in the tin for 10 minutes before turning it out onto a wire rack to cool completely.
- Cut the cake: Once the cake is completely cool, cut it into cubes or slices. I usually aim for roughly 2cm (3/4 inch) cubes.
Preparing the Strawberry Jelly
Next, we’ll make the strawberry jelly. This is a straightforward process, but make sure you allow enough time for the jelly to set completely.
- Dissolve the jelly crystals: In a large jug or bowl, dissolve the strawberry jelly crystals in the boiling water. Stir until the crystals are completely dissolved.
- Add cold water: Add the cold water and stir well.
- Add strawberries (optional): If you’re using fresh strawberries in the jelly, add them to the jelly mixture now.
- Chill: Pour the jelly into a container and refrigerate for at least 4 hours, or preferably overnight, until completely set.
- Cut the jelly: Once the jelly is set, cut it into cubes. I find it easiest to use a knife to score the jelly into a grid pattern and then scoop out the cubes.
Making Homemade Custard (Optional)
If you’re feeling ambitious, you can make your own custard. It’s surprisingly easy and tastes so much better than store-bought! If you prefer, you can skip this step and use ready-made custard.
- Ingredients for Homemade Custard:
- 600ml (2 1/2 cups) whole milk
- 4 large egg yolks
- 50g (1/4 cup) caster sugar
- 1 vanilla pod, split and seeds scraped (or 1 tsp vanilla extract)
- 2 tbsp cornstarch
- Infuse the milk: In a saucepan, heat the milk with the vanilla pod and seeds (if using) over medium heat until just simmering. Remove from the heat and let it infuse for 15-20 minutes. If using vanilla extract, add it later.
- Whisk egg yolks and sugar: In a bowl, whisk together the egg yolks, sugar, and cornstarch until pale and smooth.
- Temper the egg yolks: Gradually pour the warm milk into the egg yolk mixture, whisking constantly to prevent the eggs from scrambling.
- Cook the custard: Pour the mixture back into the saucepan and cook over low heat, stirring constantly with a wooden spoon, until the custard thickens enough to coat the back of the spoon. This will take about 5-10 minutes. Be patient and keep stirring to prevent lumps from forming.
- Strain and cool: Remove the custard from the heat and strain it through a fine-mesh sieve into a clean bowl. This will remove any lumps or bits of cooked egg. If you used vanilla extract, stir it in now.
- Prevent a skin from forming: Cover the surface of the custard with plastic wrap, pressing it directly onto the custard to prevent a skin from forming. Let it cool completely before using.
Preparing the Strawberries
Fresh strawberries are a key component of a good trifle. I like to macerate them slightly to bring out their natural sweetness.
- Hull and slice the strawberries: Hull the strawberries and halve or quarter them, depending on their size.
- Macerate the strawberries (optional): In a bowl, combine the strawberries with the caster sugar (if using). Gently toss to coat and let them sit for at least 15 minutes, or up to an hour, to release their juices. This step is optional, but it really enhances the flavor of the strawberries.
Making the Whipped Cream Topping
A light and fluffy whipped cream topping is the perfect finishing touch for our trifle.
- Chill the bowl and whisk: Chill your mixing bowl and whisk in the freezer for about 15 minutes before you start. This will help the cream whip up more quickly and easily.
- Whip the cream: In the chilled bowl, combine the double cream, icing sugar, and vanilla extract. Whip with an electric mixer until soft peaks form. Be careful not to overwhip, as the cream can turn into butter.
Assembling the Strawberry Trifle
Now for the fun part – assembling the trifle! This is where all your hard work comes together to create a beautiful and delicious dessert.
- Layer the sponge cake: Arrange a layer of sponge cake cubes in the bottom of a large trifle bowl or individual serving glasses.
- Moisten with sherry or juice (optional): Drizzle the sponge cake with sherry or strawberry juice, if using. This will help to keep the cake moist and add extra flavor.
- Add a layer of jelly: Spoon a layer of strawberry jelly cubes over the sponge cake.
- Add a layer of strawberries: Arrange a layer of the prepared strawberries over the jelly.
- Pour over the custard: Pour a layer of custard over the strawberries, ensuring it fills in all the gaps.
- Repeat layers: Repeat the layers of sponge cake, jelly, strawberries, and custard until all the ingredients are used, ending with a layer of custard.
- 225g (8oz) self-raising flour
- 225g (8oz) caster sugar
- 225g (8oz) softened butter
- 4 large eggs
- 1 tsp vanilla extract
- Pinch of salt
- 2 packets (approximately 135g/4.7oz each) strawberry jelly crystals
- 1 pint (570ml) boiling water
- 1 pint (570ml) cold water
- Optional: Fresh strawberries, sliced, for adding to the jelly
- 600ml (2 1/2 cups) ready-made fresh custard (or homemade, see instructions below)
- 500g (1.1 lbs) fresh strawberries, hulled and halved or quartered depending on size
- 2 tbsp caster sugar (optional, for macerating the strawberries)
- 300ml (1 1/4 cups) double cream (heavy cream)
- 2 tbsp icing sugar
- 1 tsp vanilla extract
- Optional: Fresh strawberries, for decoration
- Optional: Flaked almonds, toasted, for decoration
- 50-100ml (1/4 – 1/2 cup) Sherry (sweet sherry like cream sherry is best) or Strawberry Juice
- Make the Sponge Cake: Preheat oven to 350°F (180°C). Grease and line an 8-inch round cake tin. Cream butter and sugar until light and fluffy. Beat in eggs one at a time, then stir in vanilla. Fold in flour and salt until just combined. Pour into the tin and bake for 25-30 minutes, or until a skewer comes out clean. Cool in the tin for 10 minutes, then turn out onto a wire rack to cool completely. Cut into cubes or slices.
- Prepare the Strawberry Jelly: Dissolve jelly crystals in boiling water. Add cold water and stir well. Add sliced strawberries (optional). Pour into a container and refrigerate for at least 4 hours, or preferably overnight, until set. Cut into cubes.
- Make Homemade Custard (Optional): Heat milk with vanilla pod and seeds until simmering. Remove from heat and let infuse for 15-20 minutes. Whisk egg yolks, sugar, and cornstarch until pale. Gradually pour warm milk into the egg yolk mixture, whisking constantly. Pour back into the saucepan and cook over low heat, stirring constantly, until the custard thickens. Strain through a sieve into a clean bowl. Stir in vanilla extract (if using). Cover the surface with plastic wrap and let cool completely.
- Prepare the Strawberries: Hull and halve or quarter the strawberries. Combine with caster sugar (optional) and let sit for at least 15 minutes to release juices.
- Make the Whipped Cream Topping: Chill mixing bowl and whisk. Combine double cream, icing sugar, and vanilla extract in the chilled bowl. Whip with an electric mixer until soft peaks form.
- Assemble the Trifle: Arrange a layer of sponge cake cubes in the bottom of a trifle bowl. Drizzle with sherry or strawberry juice (optional). Spoon a layer of strawberry jelly cubes over the sponge cake. Arrange a layer of strawberries over the jelly. Pour a layer of custard over the strawberries. Repeat layers until all ingredients are used, ending with a layer of custard. Decorate with fresh strawberries and toasted flaked almonds (optional).
- Chill: Refrigerate the assembled trifle for at least 2 hours before serving to allow the flavors to meld.
- For a quicker trifle, use store-bought sponge cake and custard.
- Sweet sherry like cream sherry is best for drizzling over the sponge cake.
- Macerating the strawberries with sugar enhances their flavor.
- Be careful not to overwhip the cream, as it can turn into butter.
- The trifle can be assembled in a large trifle bowl or individual serving glasses.
- For best results, allow the trifle to chill for at least 2 hours before serving.
Conclusion:
This Strawberry Trifle isn’t just a dessert; it’s a celebration in a bowl! From the layers of sweet, juicy strawberries to the creamy custard and light, airy sponge, every bite is an explosion of textures and flavors that will leave you wanting more. It’s the perfect showstopper for any occasion, whether you’re hosting a summer barbecue, celebrating a birthday, or simply craving a little something special.
I truly believe this recipe is a must-try because it’s surprisingly easy to make, even though it looks incredibly impressive. You don’t need to be a professional baker to whip up this delightful treat. The steps are straightforward, and the result is a dessert that tastes like it came straight from a fancy bakery. Plus, the vibrant colors of the strawberries and custard make it a feast for the eyes as well as the palate.
But the best part? This Strawberry Trifle is incredibly versatile! Feel free to get creative with your variations. For a boozy twist, you could soak the sponge fingers in a little sherry or rum. If you’re not a fan of custard, you could substitute it with whipped cream or even a mascarpone cheese mixture for a richer, more decadent flavor. You can also experiment with different types of berries – raspberries, blueberries, or blackberries would all be delicious additions.
Serving Suggestions and Variations:
* Individual Trifles: For a more elegant presentation, assemble the trifle in individual glasses or ramekins.
* Chocolate Lovers: Add a layer of chocolate shavings or a drizzle of chocolate sauce for a chocolate-strawberry delight.
* Nutty Crunch: Sprinkle some toasted almonds or pecans on top for added texture and flavor.
* Vegan Option: Use plant-based sponge fingers, custard, and whipped cream to create a delicious vegan version.
* Seasonal Fruit: Adapt the recipe to use whatever fresh fruit is in season. Peach trifle in the summer? Yes, please!
I’m so excited for you to try this recipe and experience the joy of creating your own stunning Strawberry Trifle. It’s a dessert that’s sure to impress your friends and family, and it’s guaranteed to become a new favorite in your household.
Don’t be afraid to experiment and put your own spin on it. Baking should be fun and creative, so let your imagination run wild! And most importantly, don’t forget to share your creations with me! I’d love to see your photos and hear about your experiences. You can tag me on social media using #StrawberryTrifleMagic or leave a comment below with your thoughts and variations. I can’t wait to see what you come up with! Happy baking, and enjoy every delicious bite! I am confident that you will love this recipe as much as I do. It’s a guaranteed crowd-pleaser and a wonderful way to celebrate any occasion. So go ahead, gather your ingredients, and get ready to create a truly unforgettable dessert. You won’t regret it!
Strawberry Trifle: A Delicious and Easy Dessert Recipe
A classic Strawberry Trifle with layers of sponge cake, strawberry jelly, fresh strawberries, creamy custard, and whipped cream. Perfect for parties!