
Olive cheese bread, oh, where do I even begin? Imagine sinking your teeth into a warm, crusty loaf, the tangy olives and sharp cheddar creating an explosion of flavor that dances across your palate. It’s a culinary experience that’s both comforting and utterly irresistible, and I’m thrilled to share my foolproof recipe with you!
While the exact origins of olive cheese bread are a bit hazy, its popularity has undoubtedly been fueled by its simple elegance and crowd-pleasing nature. Some believe it has roots in Italian or Mediterranean cuisine, where olives and cheese are staples. Regardless of its precise history, this savory bread has become a beloved appetizer, side dish, and even a satisfying snack in homes across the globe.
What makes olive cheese bread so universally adored? It’s the perfect combination of textures – the crisp exterior giving way to a soft, chewy interior, studded with briny olives and melted cheese. The salty, savory flavors are incredibly addictive, and it’s a dish that’s equally at home on a casual weeknight dinner table or a sophisticated holiday buffet. Plus, it’s surprisingly easy to make, requiring minimal ingredients and effort. Trust me, once you try this recipe, you’ll be hooked!

Ingredients:
- For the Dough:
- 3 1/2 cups (420g) all-purpose flour, plus more for dusting
- 1 teaspoon granulated sugar
- 1 packet (2 1/4 teaspoons) active dry yeast
- 1 1/2 teaspoons salt
- 1 1/2 cups (360ml) warm water (105-115°F / 40-46°C)
- 2 tablespoons olive oil, plus more for greasing
- For the Olive Cheese Filling:
- 1 cup (approximately 6 ounces) pitted Kalamata olives, roughly chopped
- 1 cup (approximately 6 ounces) pitted green olives, roughly chopped
- 1 1/2 cups (6 ounces) shredded mozzarella cheese
- 1 cup (4 ounces) shredded provolone cheese
- 1/2 cup (2 ounces) grated Parmesan cheese
- 2 cloves garlic, minced
- 1/4 cup olive oil
- 1 tablespoon fresh oregano, chopped (or 1 teaspoon dried oregano)
- 1/4 teaspoon red pepper flakes (optional)
- Freshly ground black pepper to taste
- For the Egg Wash (Optional):
- 1 large egg
- 1 tablespoon milk or water
- For Garnish (Optional):
- Coarse sea salt
- Freshly chopped parsley
Preparing the Dough:
Alright, let’s get started with the dough! This is the foundation of our delicious olive cheese bread, so we want to make sure we get it right. Don’t worry, it’s easier than you think!
- Combine Dry Ingredients: In a large bowl, whisk together the flour, sugar, salt, and yeast. Make sure the yeast is evenly distributed throughout the flour. This will help it activate properly.
- Add Wet Ingredients: Make a well in the center of the dry ingredients and pour in the warm water and olive oil.
- Mix the Dough: Using a wooden spoon or your hands, gradually mix the wet ingredients into the dry ingredients until a shaggy dough forms.
- Knead the Dough: Turn the dough out onto a lightly floured surface. Knead the dough for 8-10 minutes, or until it becomes smooth and elastic. If the dough is too sticky, add a little more flour, one tablespoon at a time. If it’s too dry, add a teaspoon of water at a time. You can also use a stand mixer with a dough hook attachment for this step. Knead on medium speed for about 6-8 minutes.
- First Rise: Lightly grease a large bowl with olive oil. Place the dough in the bowl, turning to coat all sides. Cover the bowl with plastic wrap or a clean kitchen towel. Let the dough rise in a warm place for 1-1.5 hours, or until it has doubled in size. This is crucial for a light and airy bread!
Preparing the Olive Cheese Filling:
While the dough is rising, let’s get that amazing olive cheese filling ready. This is where all the flavor comes from, so don’t skimp on the ingredients!
- Combine Olives and Garlic: In a medium bowl, combine the chopped Kalamata olives, green olives, and minced garlic.
- Add Cheese: Add the shredded mozzarella, provolone, and Parmesan cheeses to the bowl.
- Season the Filling: Pour in the olive oil, add the chopped oregano (or dried oregano), red pepper flakes (if using), and freshly ground black pepper.
- Mix Well: Toss all the ingredients together until they are evenly combined. Make sure the cheese is well distributed throughout the olive mixture.
Assembling and Baking the Olive Cheese Bread:
Now for the fun part – putting it all together! This is where our olive cheese bread really starts to take shape.
- Preheat Oven: Preheat your oven to 375°F (190°C). Line a baking sheet with parchment paper.
- Punch Down the Dough: Once the dough has doubled in size, gently punch it down to release the air.
- Divide the Dough: Turn the dough out onto a lightly floured surface. Divide the dough in half.
- Roll Out the First Half: Roll out one half of the dough into a large rectangle, about 12×16 inches.
- Spread the Filling: Sprinkle half of the olive cheese filling evenly over the dough, leaving a 1-inch border along the edges.
- Roll Up the Dough: Starting from one of the long edges, tightly roll up the dough into a log. Pinch the seam to seal it.
- Repeat with Second Half: Repeat steps 4-6 with the remaining dough and filling.
- Place on Baking Sheet: Carefully transfer the two logs to the prepared baking sheet, seam-side down.
- Make Slits (Optional): Using a sharp knife or kitchen shears, make several diagonal slits across the top of each log. This will allow steam to escape during baking and prevent the bread from bursting.
- Egg Wash (Optional): In a small bowl, whisk together the egg and milk (or water). Brush the egg wash evenly over the top of each log. This will give the bread a beautiful golden-brown color.
- Garnish (Optional): Sprinkle the tops of the logs with coarse sea salt and freshly chopped parsley.
- Bake: Bake for 25-30 minutes, or until the bread is golden brown and the filling is bubbly.
- Cool: Let the bread cool on the baking sheet for a few minutes before transferring it to a wire rack to cool completely.
Serving and Storing:
Finally, the moment we’ve all been waiting for – enjoying our homemade olive cheese bread! Here are a few tips for serving and storing it.
- Serve Warm: Olive cheese bread is best served warm, when the cheese is melted and gooey.
- Slice and Enjoy: Slice the bread into thick slices and serve as an appetizer, side dish, or snack.
- Pairing Suggestions: This bread pairs perfectly with soups, salads, or a glass of wine.
- Storing Leftovers: Store any leftover bread in an airtight container at room temperature for up to 2 days, or in the refrigerator for up to 5 days.
- Reheating: To reheat, wrap the bread in foil and bake in a preheated oven at 350°F (175°C) for 10-15 minutes, or until warmed through. You can also microwave individual slices for a few seconds.
- Freezing: For longer storage, you can freeze the bread. Wrap it tightly in plastic wrap and then in foil, or place it in a freezer bag. Freeze for up to 2 months. Thaw overnight in the refrigerator before reheating.
Tips for Success:
- Use Fresh Yeast: Make sure your yeast is fresh for the best results. If you’re unsure, test it by dissolving it in warm water with a pinch of sugar. If it foams up within 5-10 minutes, it’s good to go.
- Don’t Overknead: Overkneading can result in a tough bread. Knead the dough until it’s smooth and elastic, but not overly stiff.
- Warm Place for Rising: A warm place is essential for the dough to rise properly. You can place the bowl in a slightly warmed oven (turned off!), near a sunny window, or on top of the refrigerator.
- Adjust Filling to Taste: Feel free to adjust the olive and cheese ratio to your liking. You can also add other ingredients, such as sun-dried tomatoes, roasted red peppers, or different types of cheese.
- Don’t Overbake: Overbaking can result in a dry bread. Keep an eye on the bread while it’s baking and remove it from the oven when it’s golden brown and the filling is bubbly.
Conclusion:
This olive cheese bread isn’t just another recipe; it’s an experience waiting to happen. The salty olives, the creamy cheese, and the perfectly baked bread combine to create a symphony of flavors and textures that will leave you wanting more. Trust me, once you’ve tasted this, you’ll understand why I’m so passionate about it! It’s the kind of bread that disappears quickly at gatherings, and the aroma alone is enough to make your kitchen the most inviting room in the house.
Why is this a must-try? Because it’s incredibly easy to make, uses readily available ingredients, and delivers a restaurant-quality result every single time. Forget store-bought bread; this homemade version is bursting with fresh flavor and has a satisfyingly chewy crust that’s simply irresistible. It’s a guaranteed crowd-pleaser, perfect for everything from casual weeknight dinners to elegant weekend brunches. Plus, the satisfaction of baking your own bread is a reward in itself!
But the best part? It’s incredibly versatile! Serve it warm with a simple bowl of tomato soup for a comforting lunch, or slice it thinly and use it as a base for bruschetta topped with fresh tomatoes, basil, and a drizzle of balsamic glaze. For a truly decadent experience, try grilling slices of the olive cheese bread and serving them alongside a cheese board with a selection of your favorite cheeses and cured meats. It’s also fantastic dipped in olive oil and balsamic vinegar.
Looking for variations? Get creative! Add a sprinkle of red pepper flakes for a touch of heat, or incorporate some sun-dried tomatoes for an extra burst of flavor. Experiment with different types of cheese – Gruyere, Fontina, or even a sharp cheddar would all work beautifully. You could also try adding some fresh herbs like rosemary or thyme to the dough for an even more aromatic bread. If you’re feeling adventurous, consider adding a swirl of pesto to the dough before baking for a vibrant green and flavorful twist. Don’t be afraid to experiment and make it your own!
I truly believe that this olive cheese bread will become a staple in your kitchen. It’s more than just a recipe; it’s a way to bring people together, to share delicious food, and to create lasting memories. The simple act of baking can be incredibly therapeutic, and the reward of enjoying a warm, homemade loaf of bread is simply unmatched.
So, what are you waiting for? Preheat your oven, gather your ingredients, and get ready to experience the joy of baking this incredible olive cheese bread. I’m confident that you’ll love it as much as I do. And when you do, please, please, please share your experience! I’d love to hear about your variations, your serving suggestions, and how much your family and friends enjoyed it. Tag me in your photos on social media – I can’t wait to see your creations! Happy baking! Let me know if you have any questions, and I’m always happy to help. Enjoy!
Olive Cheese Bread: The Ultimate Guide to Baking Deliciousness
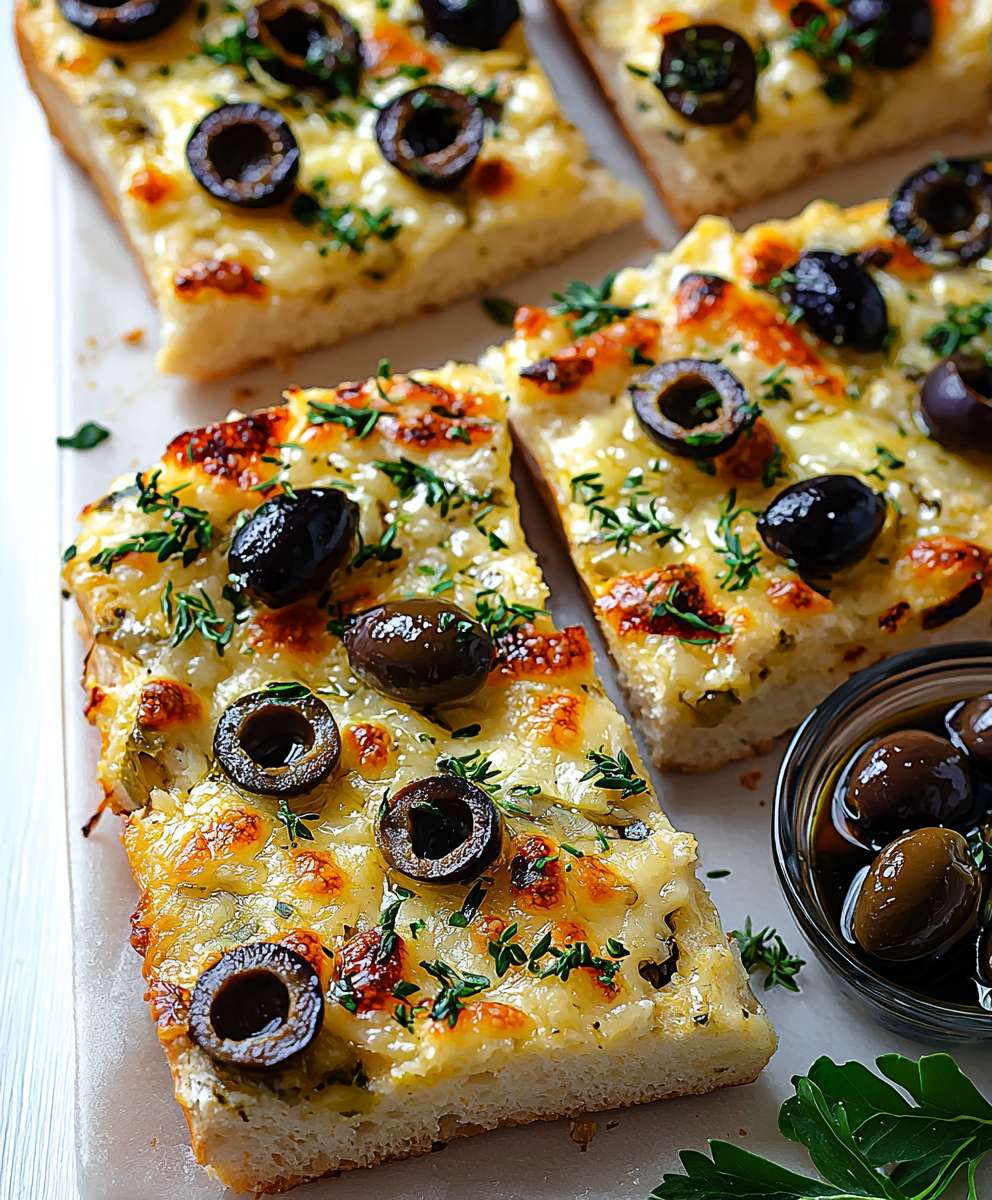
Savory olive cheese bread, perfect as an appetizer or side dish. Filled with Kalamata and green olives, mozzarella, provolone, and Parmesan cheeses, this bread is bursting with flavor.
Ingredients
- 3 1/2 cups (420g) all-purpose flour, plus more for dusting
- 1 teaspoon granulated sugar
- 1 packet (2 1/4 teaspoons) active dry yeast
- 1 1/2 teaspoons salt
- 1 1/2 cups (360ml) warm water (105-115°F / 40-46°C)
- 2 tablespoons olive oil, plus more for greasing
- 1 cup (approximately 6 ounces) pitted Kalamata olives, roughly chopped
- 1 cup (approximately 6 ounces) pitted green olives, roughly chopped
- 1 1/2 cups (6 ounces) shredded mozzarella cheese
- 1 cup (4 ounces) shredded provolone cheese
- 1/2 cup (2 ounces) grated Parmesan cheese
- 2 cloves garlic, minced
- 1/4 cup olive oil
- 1 tablespoon fresh oregano, chopped (or 1 teaspoon dried oregano)
- 1/4 teaspoon red pepper flakes (optional)
- Freshly ground black pepper to taste
- 1 large egg
- 1 tablespoon milk or water
- Coarse sea salt
- Freshly chopped parsley
Instructions
- Prepare the Dough:
- Combine Dry Ingredients: In a large bowl, whisk together the flour, sugar, salt, and yeast.
- Add Wet Ingredients: Make a well in the center of the dry ingredients and pour in the warm water and olive oil.
- Mix the Dough: Using a wooden spoon or your hands, gradually mix the wet ingredients into the dry ingredients until a shaggy dough forms.
- Knead the Dough: Turn the dough out onto a lightly floured surface. Knead the dough for 8-10 minutes, or until it becomes smooth and elastic. If the dough is too sticky, add a little more flour, one tablespoon at a time. If it’s too dry, add a teaspoon of water at a time. You can also use a stand mixer with a dough hook attachment for this step. Knead on medium speed for about 6-8 minutes.
- First Rise: Lightly grease a large bowl with olive oil. Place the dough in the bowl, turning to coat all sides. Cover the bowl with plastic wrap or a clean kitchen towel. Let the dough rise in a warm place for 1-1.5 hours, or until it has doubled in size.
- Prepare the Olive Cheese Filling:
- Combine Olives and Garlic: In a medium bowl, combine the chopped Kalamata olives, green olives, and minced garlic.
- Add Cheese: Add the shredded mozzarella, provolone, and Parmesan cheeses to the bowl.
- Season the Filling: Pour in the olive oil, add the chopped oregano (or dried oregano), red pepper flakes (if using), and freshly ground black pepper.
- Mix Well: Toss all the ingredients together until they are evenly combined.
- Assemble and Bake:
- Preheat Oven: Preheat your oven to 375°F (190°C). Line a baking sheet with parchment paper.
- Punch Down the Dough: Once the dough has doubled in size, gently punch it down to release the air.
- Divide the Dough: Turn the dough out onto a lightly floured surface. Divide the dough in half.
- Roll Out the First Half: Roll out one half of the dough into a large rectangle, about 12×16 inches.
- Spread the Filling: Sprinkle half of the olive cheese filling evenly over the dough, leaving a 1-inch border along the edges.
- Roll Up the Dough: Starting from one of the long edges, tightly roll up the dough into a log. Pinch the seam to seal it.
- Repeat with Second Half: Repeat steps 4-6 with the remaining dough and filling.
- Place on Baking Sheet: Carefully transfer the two logs to the prepared baking sheet, seam-side down.
- Make Slits (Optional): Using a sharp knife or kitchen shears, make several diagonal slits across the top of each log.
- Egg Wash (Optional): In a small bowl, whisk together the egg and milk (or water). Brush the egg wash evenly over the top of each log.
- Garnish (Optional): Sprinkle the tops of the logs with coarse sea salt and freshly chopped parsley.
- Bake: Bake for 25-30 minutes, or until the bread is golden brown and the filling is bubbly.
- Cool: Let the bread cool on the baking sheet for a few minutes before transferring it to a wire rack to cool completely.
- Serving and Storing:
- Serve warm.
- Slice and enjoy.
- Pairs perfectly with soups, salads, or a glass of wine.
- Store leftovers in an airtight container at room temperature for up to 2 days, or in the refrigerator for up to 5 days.
- To reheat, wrap the bread in foil and bake in a preheated oven at 350°F (175°C) for 10-15 minutes, or until warmed through. You can also microwave individual slices for a few seconds.
- For longer storage, you can freeze the bread. Wrap it tightly in plastic wrap and then in foil, or place it in a freezer bag. Freeze for up to 2 months. Thaw overnight in the refrigerator before reheating.
Notes
- Use fresh yeast for the best results. Test it by dissolving it in warm water with a pinch of sugar. If it foams up within 5-10 minutes, it’s good to go.
- Don’t overknead the dough. Knead until it’s smooth and elastic, but not overly stiff.
- A warm place is essential for the dough to rise properly. You can place the bowl in a slightly warmed oven (turned off!), near a sunny window, or on top of the refrigerator.
- Adjust the olive and cheese ratio to your liking. You can also add other ingredients, such as sun-dried tomatoes, roasted red peppers, or different types of cheese.
- Don’t overbake the bread. Keep an eye on it while it’s baking and remove it from the oven when it’s golden brown and the filling is bubbly.