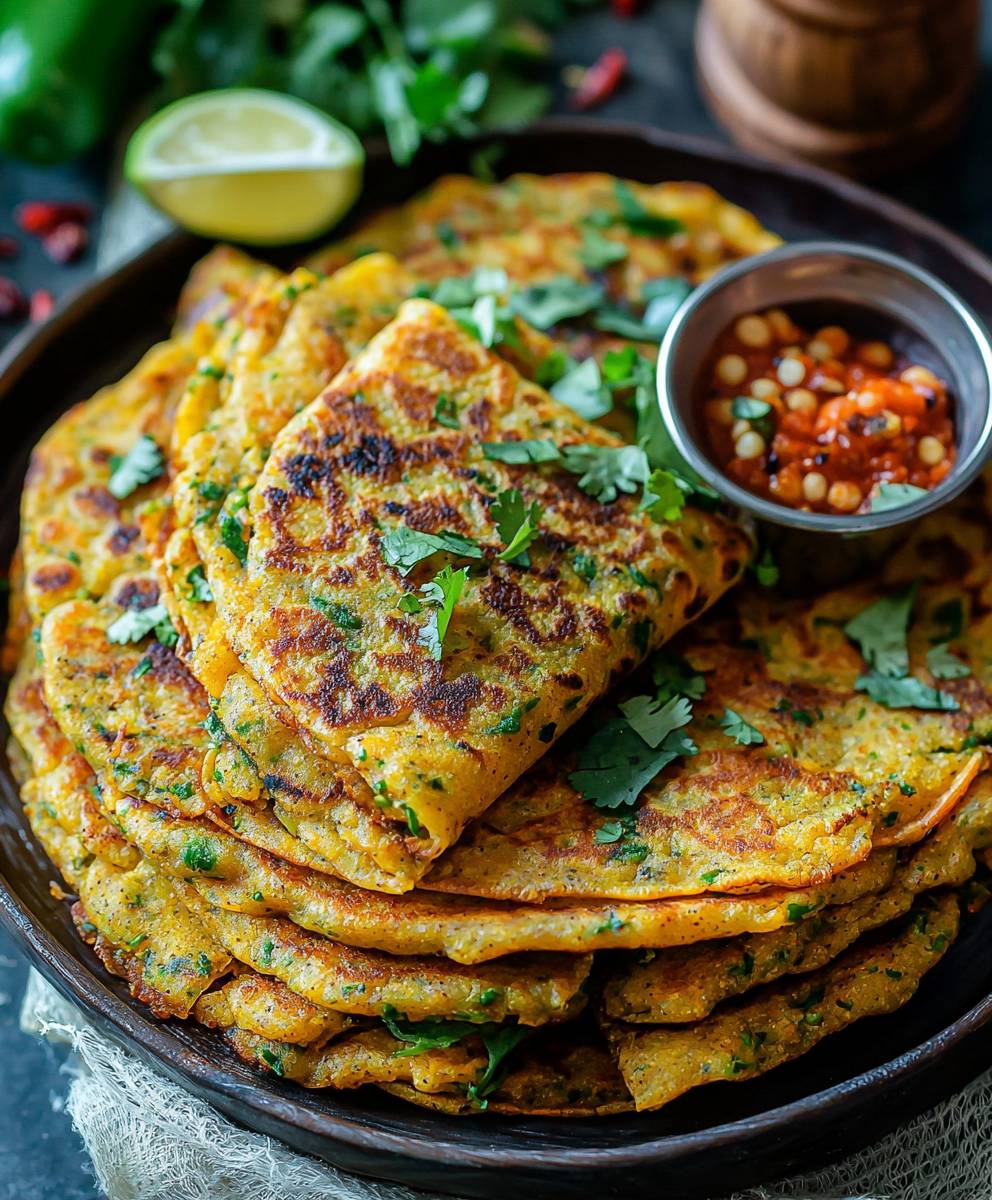
Moong Dal Chilla, a savory and satisfying pancake made from ground moong dal (split yellow lentils), is a breakfast staple in many Indian households, and I’m thrilled to share my foolproof recipe with you! Forget those bland, boring breakfasts; this vibrant and protein-packed dish will awaken your taste buds and keep you energized throughout the morning.
The history of Moong Dal Chilla is deeply rooted in Indian culinary traditions, where lentils have been a cornerstone of the diet for centuries. Passed down through generations, this recipe showcases the versatility of moong dal, transforming it into a delicious and nutritious meal. It’s a testament to how simple ingredients can create something truly special.
What makes Moong Dal Chilla so beloved? Well, for starters, it’s incredibly versatile. You can customize it with your favorite vegetables, spices, and chutneys. But beyond its adaptability, people adore the delightful combination of textures – the slightly crispy edges giving way to a soft, almost creamy interior. The subtle, earthy flavor of the moong dal is perfectly balanced by the aromatic spices, creating a symphony of tastes that will leave you wanting more. Plus, it’s a relatively quick and easy recipe to prepare, making it perfect for busy mornings or a light lunch. So, are you ready to experience the magic of Moong Dal Chilla? Let’s get cooking!

Ingredients:
- 1 cup Moong Dal (Yellow Split Lentils)
- 1/2 inch Ginger, peeled
- 2-3 Green Chilies, finely chopped (adjust to your spice preference)
- 1/4 cup Coriander Leaves, finely chopped
- 1/4 teaspoon Asafoetida (Hing)
- 1/2 teaspoon Cumin Seeds (Jeera)
- 1/4 teaspoon Turmeric Powder (Haldi)
- Salt to taste
- Water, as needed
- Oil or Ghee, for cooking
Soaking the Moong Dal:
Before we dive into making the chilla batter, we need to soak the moong dal. This is a crucial step as it softens the lentils, making them easier to grind into a smooth batter. Trust me, a smooth batter is key to achieving those perfectly thin and crispy chillas!
- Rinse the Moong Dal: Start by thoroughly rinsing the moong dal under cold running water. This helps remove any impurities and excess starch. I usually rinse it until the water runs clear.
- Soak the Dal: Place the rinsed moong dal in a bowl and add enough water to completely submerge it. The dal will expand as it soaks, so make sure there’s plenty of water.
- Soaking Time: Let the moong dal soak for at least 4-5 hours, or even better, overnight. The longer it soaks, the smoother the batter will be. I often soak it before going to bed and grind it in the morning.
Preparing the Chilla Batter:
Now that our moong dal is nicely soaked, it’s time to transform it into a delicious chilla batter. This is where the magic happens! We’ll be blending the dal with spices and herbs to create a flavorful base for our chillas.
- Drain the Soaked Dal: Drain the soaked moong dal completely. Discard the soaking water.
- Grind the Dal: Transfer the drained moong dal to a blender or food processor. Add the ginger and green chilies.
- Add Water Gradually: Start by adding about 1/4 cup of water. Blend the mixture until it forms a smooth paste. If needed, add more water, one tablespoon at a time, until you achieve a batter-like consistency. The batter should be smooth and pourable, but not too thin. I usually aim for a consistency similar to pancake batter.
- Transfer to a Bowl: Pour the ground batter into a mixing bowl.
- Add Spices and Herbs: Add the asafoetida, cumin seeds, turmeric powder, coriander leaves, and salt to the batter.
- Mix Well: Mix all the ingredients thoroughly until everything is well combined. Make sure there are no lumps in the batter.
- Adjust Consistency (if needed): If the batter seems too thick, add a little more water to adjust the consistency. Remember, we want a smooth, pourable batter.
- Rest the Batter (Optional): While not strictly necessary, letting the batter rest for about 15-20 minutes can help the flavors meld together. I find it enhances the overall taste of the chillas.
Cooking the Moong Dal Chillas:
Alright, the batter is ready, and now comes the fun part – cooking the chillas! This is where we transform that batter into golden-brown, crispy delights. Don’t worry if your first chilla isn’t perfect; it takes a little practice to get the hang of it. But trust me, the effort is worth it!
- Heat the Tawa or Pan: Heat a flat non-stick tawa (griddle) or pan over medium heat. The pan needs to be hot enough so that the chilla cooks properly, but not so hot that it burns.
- Grease the Tawa: Lightly grease the tawa with oil or ghee. You can use a brush or a paper towel to spread the oil evenly. I prefer using ghee for a richer flavor.
- Pour the Batter: Once the tawa is hot, pour a ladleful of batter onto the center of the tawa.
- Spread the Batter: Using the back of the ladle, gently spread the batter in a circular motion to form a thin, even circle. Aim for a diameter of about 6-8 inches. Don’t worry if it’s not perfectly round; the taste is what matters!
- Cook the Chilla: Cook the chilla for about 2-3 minutes, or until the bottom starts to turn golden brown and the edges begin to lift from the tawa.
- Drizzle with Oil/Ghee: Drizzle a little oil or ghee around the edges of the chilla. This will help it cook evenly and become nice and crispy.
- Flip the Chilla: Carefully flip the chilla using a spatula.
- Cook the Other Side: Cook the other side for another 2-3 minutes, or until it is also golden brown and cooked through. Press gently with the spatula to ensure even cooking.
- Remove and Serve: Once the chilla is cooked on both sides, remove it from the tawa and place it on a plate.
- Repeat: Repeat the process with the remaining batter, greasing the tawa each time before pouring the batter.
Serving Suggestions:
Your delicious moong dal chillas are now ready to be enjoyed! Here are a few serving suggestions to elevate your chilla experience:
- With Green Chutney: Serve the chillas with a generous dollop of green chutney (coriander-mint chutney). The cool, refreshing chutney complements the savory chillas perfectly.
- With Tomato Ketchup: For a simpler option, serve with tomato ketchup. This is a great choice for kids (and adults who love ketchup!).
- With Yogurt: A side of plain yogurt or raita (yogurt with vegetables) is another excellent accompaniment. The yogurt adds a creamy coolness that balances the flavors.
- Stuffed Chillas: Get creative and stuff your chillas with a filling of your choice. Some popular options include:
- Paneer Bhurji: Scrambled paneer (Indian cheese) with spices.
- Potato Filling: Spiced mashed potatoes.
- Vegetable Medley: A mix of sautéed vegetables like onions, peppers, and carrots.
- As a Wrap: Use the chilla as a wrap for your favorite fillings, such as grilled chicken, tofu, or vegetables.
Tips for Perfect Chillas:
Here are a few extra tips to help you achieve chilla perfection:
- Batter Consistency is Key: The consistency of the batter is crucial. It should be smooth and pourable, but not too thin. If the batter is too thin, the chillas will be difficult to flip and may break. If it’s too thick, they will be dense and heavy.
- Don’t Overcrowd the Tawa: Cook one chilla at a time to ensure even cooking and prevent them from sticking together.
- Adjust Heat as Needed: If the chillas are browning too quickly, reduce the heat to medium-low. If they are not browning enough, increase the heat slightly.
- Use a Non-Stick Tawa: A non-stick tawa is essential for preventing the chillas from sticking.
- Experiment with Flavors: Feel free to experiment with different spices and herbs to customize the flavor of your chillas. You can add grated carrots, chopped spinach, or even a pinch of garam masala to the batter.
Variations:
Moong dal chillas are incredibly versatile, and there are many ways to customize them to your liking. Here are a few variations to try:
- Spicy Chillas: Add more green chilies or a pinch of red chili powder to the batter for a spicier kick.
- Garlic Chillas: Add a clove or two of minced garlic to the batter for a savory flavor.
- Onion Chillas: Add finely chopped onions to the batter for a bit of crunch and flavor.
- Spinach Chillas: Add chopped spinach to the batter for a healthy and nutritious twist.
- Cheese Chillas: Sprinkle grated cheese on top of the chilla while it’s cooking for a cheesy and delicious treat.
Enjoy your homemade Moong Dal Chillas! I hope you find this recipe helpful and that you have as much fun making (and eating!) them as I do.
Conclusion:
And there you have it! This Moong Dal Chilla recipe is truly a game-changer, and I wholeheartedly believe it deserves a spot in your regular meal rotation. Why? Because it’s not just delicious; it’s also incredibly versatile, packed with protein, and surprisingly easy to whip up, even on a busy weeknight. It’s a guilt-free way to enjoy a savory, satisfying meal that will leave you feeling energized and ready to tackle anything.
Think of it as your blank canvas for culinary creativity! While I’ve shared my go-to method, the beauty of this recipe lies in its adaptability. Feeling adventurous? Try adding finely chopped spinach, grated carrots, or even some diced bell peppers to the batter for an extra boost of nutrients and flavor. A sprinkle of red pepper flakes can add a delightful kick for those who like a little heat.
Serving suggestions are endless! I personally love enjoying my Moong Dal Chilla with a dollop of fresh yogurt and a vibrant cilantro-mint chutney. The cool yogurt perfectly complements the warm, savory chilla, while the chutney adds a refreshing burst of flavor. You could also serve it with a side of tangy tamarind chutney or even a simple tomato salsa. For a more substantial meal, consider stuffing the chilla with a spiced potato filling, paneer, or even some leftover cooked vegetables. It transforms into a delicious and satisfying wrap!
Another fantastic variation is to use different types of lentils. While moong dal is the star of this recipe, you can experiment with other lentils like masoor dal or urad dal for a slightly different flavor profile and texture. Just remember to adjust the soaking time accordingly. You can also experiment with different spices. A pinch of garam masala, amchur powder (dried mango powder), or even a dash of black salt can elevate the flavor of your chilla to a whole new level.
Don’t be intimidated by the thought of making your own chilla. The process is much simpler than you might think, and the results are well worth the effort. Plus, it’s a fantastic way to use up any leftover lentils you might have in your pantry.
I’m confident that once you try this recipe, you’ll be hooked! It’s a healthy, delicious, and incredibly versatile dish that’s perfect for breakfast, lunch, or dinner. It’s also a great option for those looking for gluten-free or vegetarian meal ideas.
So, what are you waiting for? Grab your ingredients, put on your apron, and get ready to create some culinary magic. I’m absolutely certain you’ll love this Moong Dal Chilla as much as I do.
And most importantly, I’d love to hear about your experience! Once you’ve tried the recipe, please come back and share your thoughts in the comments below. Did you make any variations? What were your favorite toppings? What did you serve it with? Your feedback is invaluable, and it helps me to continue creating recipes that you’ll love. Happy cooking! I can’t wait to hear all about your chilla adventures!
Moong Dal Chilla: A Delicious & Healthy Recipe
Savory and protein-packed Moong Dal Chillas (yellow lentil pancakes) are a delicious and healthy Indian breakfast or snack. Made with simple ingredients, these chillas are easy to prepare and can be customized with your favorite spices and toppings.
Ingredients
- 1 cup Moong Dal (Yellow Split Lentils)
- 1/2 inch Ginger, peeled
- 2-3 Green Chilies, finely chopped (adjust to your spice preference)
- 1/4 cup Coriander Leaves, finely chopped
- 1/4 teaspoon Asafoetida (Hing)
- 1/2 teaspoon Cumin Seeds (Jeera)
- 1/4 teaspoon Turmeric Powder (Haldi)
- Salt to taste
- Water, as needed
- Oil or Ghee, for cooking
Instructions
- Soak the Moong Dal: Rinse the moong dal under cold running water until the water runs clear. Place the rinsed moong dal in a bowl and add enough water to completely submerge it. Soak for at least 4-5 hours, or overnight.
- Prepare the Chilla Batter: Drain the soaked moong dal completely. Transfer the drained moong dal to a blender or food processor. Add the ginger and green chilies.
- Add about 1/4 cup of water. Blend the mixture until it forms a smooth paste. If needed, add more water, one tablespoon at a time, until you achieve a batter-like consistency. The batter should be smooth and pourable, but not too thin.
- Pour the ground batter into a mixing bowl. Add the asafoetida, cumin seeds, turmeric powder, coriander leaves, and salt to the batter.
- Mix all the ingredients thoroughly until everything is well combined. Make sure there are no lumps in the batter.
- If the batter seems too thick, add a little more water to adjust the consistency.
- Letting the batter rest for about 15-20 minutes can help the flavors meld together.
- Cook the Moong Dal Chillas: Heat a flat non-stick tawa (griddle) or pan over medium heat. Lightly grease the tawa with oil or ghee.
- Once the tawa is hot, pour a ladleful of batter onto the center of the tawa.
- Using the back of the ladle, gently spread the batter in a circular motion to form a thin, even circle. Aim for a diameter of about 6-8 inches.
- Cook the chilla for about 2-3 minutes, or until the bottom starts to turn golden brown and the edges begin to lift from the tawa.
- Drizzle a little oil or ghee around the edges of the chilla.
- Carefully flip the chilla using a spatula.
- Cook the other side for another 2-3 minutes, or until it is also golden brown and cooked through. Press gently with the spatula to ensure even cooking.
- Once the chilla is cooked on both sides, remove it from the tawa and place it on a plate.
- Repeat the process with the remaining batter, greasing the tawa each time before pouring the batter.
- Serve: Serve hot with green chutney, tomato ketchup, or yogurt. You can also stuff the chillas with paneer bhurji, potato filling, or a vegetable medley.
Notes
- Batter Consistency: The consistency of the batter is crucial. It should be smooth and pourable, but not too thin. If the batter is too thin, the chillas will be difficult to flip and may break. If it’s too thick, they will be dense and heavy.
- Don’t Overcrowd the Tawa: Cook one chilla at a time to ensure even cooking and prevent them from sticking together.
- Adjust Heat as Needed: If the chillas are browning too quickly, reduce the heat to medium-low. If they are not browning enough, increase the heat slightly.
- Use a Non-Stick Tawa: A non-stick tawa is essential for preventing the chillas from sticking.
- Experiment with Flavors: Feel free to experiment with different spices and herbs to customize the flavor of your chillas. You can add grated carrots, chopped spinach, or even a pinch of garam masala to the batter.
- Soaking Time: Soaking the dal for longer (overnight) results in a smoother batter.
- Resting the Batter: Resting the batter for 15-20 minutes allows the flavors to meld.