
Grilled Halloumi Skewers: Prepare to embark on a culinary adventure that will tantalize your taste buds and leave you craving more! Imagine biting into perfectly grilled, golden-brown halloumi cheese, its salty, slightly tangy flavor enhanced by the smoky char of the grill. Interspersed with vibrant, juicy vegetables, these skewers are not just a meal; they’re an experience.
Halloumi, originating from Cyprus, has a rich history dating back centuries. Traditionally made from goat’s, sheep’s, or cow’s milk, this semi-hard, unripened cheese boasts a unique high melting point, making it ideal for grilling and frying. For generations, Cypriots have enjoyed halloumi as a staple, often served grilled with watermelon during the warm summer months. It’s a symbol of Cypriot hospitality and culinary heritage.
But what makes grilled halloumi skewers so universally loved? It’s the delightful combination of textures and flavors. The squeaky, slightly chewy texture of the halloumi contrasts beautifully with the soft, yielding vegetables. The salty cheese is perfectly balanced by the sweetness of bell peppers, the tang of cherry tomatoes, and the earthy notes of zucchini. Plus, they are incredibly easy and quick to prepare, making them perfect for a weeknight dinner or a weekend barbecue. Whether you’re a seasoned grill master or a novice cook, these skewers are guaranteed to impress. So, fire up your grill and let’s get started!

Ingredients:
- 2 blocks (8 ounces each) Halloumi cheese, cut into 1-inch cubes
- 1 red bell pepper, cut into 1-inch pieces
- 1 yellow bell pepper, cut into 1-inch pieces
- 1 zucchini, cut into 1/2-inch thick rounds
- 1 red onion, cut into 1-inch wedges
- 1 pint cherry tomatoes
- 1/4 cup olive oil, plus more for grilling
- 2 tablespoons lemon juice
- 1 tablespoon dried oregano
- 1 teaspoon garlic powder
- 1/2 teaspoon red pepper flakes (optional)
- Salt and freshly ground black pepper to taste
- Wooden or metal skewers (if using wooden skewers, soak them in water for at least 30 minutes to prevent burning)
- Fresh parsley, chopped (for garnish)
Preparing the Vegetables and Halloumi:
- First, let’s get our veggies prepped! Wash all the vegetables thoroughly. This is a crucial step, especially if you haven’t bought organic.
- Now, chop the bell peppers. Remove the stems and seeds from the red and yellow bell peppers. Cut them into approximately 1-inch pieces. Try to keep the pieces relatively uniform in size so they cook evenly on the grill.
- Next, slice the zucchini. Cut the zucchini into rounds that are about 1/2-inch thick. This thickness will ensure they cook through without becoming too mushy on the grill.
- Prepare the red onion. Cut the red onion in half through the root end. Then, cut each half into wedges that are about 1-inch in size. This will allow the onion to stay intact on the skewer and grill nicely.
- Rinse the cherry tomatoes. Make sure they are dry before adding them to the skewers.
- Now, let’s tackle the halloumi. Open the packages of halloumi cheese. Pat the cheese dry with paper towels. This helps it to get a nice sear on the grill. Cut each block of halloumi into 1-inch cubes. Again, try to keep the cubes as uniform as possible for even cooking.
Marinating the Vegetables (Optional but Recommended):
- In a large bowl, combine the chopped bell peppers, zucchini rounds, and red onion wedges.
- In a small bowl, whisk together the 1/4 cup of olive oil, lemon juice, dried oregano, garlic powder, and red pepper flakes (if using). Season with salt and freshly ground black pepper to taste. Don’t be shy with the seasoning! Halloumi is quite salty, so the vegetables need a good amount of flavor to balance it out.
- Pour the marinade over the vegetables in the large bowl. Toss well to ensure all the vegetables are evenly coated.
- Let the vegetables marinate for at least 15 minutes, or up to 30 minutes, at room temperature. This step is optional, but it really enhances the flavor of the vegetables. The longer they marinate, the more flavorful they will become.
Assembling the Skewers:
- If you are using wooden skewers, make sure they have been soaked in water for at least 30 minutes. This will prevent them from burning on the grill.
- Now, it’s time to assemble the skewers! Thread the vegetables and halloumi onto the skewers in an alternating pattern. You can arrange them however you like, but I usually go for something like this: bell pepper, zucchini, halloumi, red onion, cherry tomato, and then repeat.
- Try not to overcrowd the skewers. Leave a little space between each piece so that the heat can circulate and cook everything evenly.
- Continue assembling the skewers until all the vegetables and halloumi have been used. You should end up with about 6-8 skewers, depending on how much you put on each one.
Grilling the Halloumi Skewers:
- Preheat your grill to medium-high heat. Make sure the grates are clean and lightly oiled to prevent sticking. You can use a grill brush to clean the grates and then rub them with an oil-soaked paper towel.
- Carefully place the halloumi skewers on the preheated grill.
- Grill for about 2-3 minutes per side, or until the halloumi is golden brown and slightly softened, and the vegetables are tender-crisp. Keep a close eye on the skewers, as the halloumi can brown quickly.
- Turn the skewers frequently to ensure even cooking and prevent burning.
- If the vegetables start to brown too quickly, you can move the skewers to a cooler part of the grill or reduce the heat slightly.
- The halloumi should be slightly softened and have nice grill marks. The vegetables should be tender-crisp and slightly charred.
Serving and Enjoying:
- Once the halloumi skewers are grilled to perfection, remove them from the grill and place them on a serving platter.
- Garnish with fresh chopped parsley for a pop of color and freshness.
- Serve the grilled halloumi skewers immediately. They are best enjoyed hot off the grill.
- These skewers are delicious on their own as an appetizer or snack.
- You can also serve them as a main course with a side of couscous, quinoa, or a fresh salad.
- They are also great in pita bread with some hummus and tzatziki sauce for a delicious Mediterranean-inspired meal.
- If you have any leftover skewers, you can store them in an airtight container in the refrigerator for up to 2 days. Reheat them gently in a skillet or microwave before serving.
Tips for Perfect Grilled Halloumi Skewers:
- Soak wooden skewers: This prevents them from burning on the grill.
- Pat the halloumi dry: This helps it to get a nice sear.
- Don’t overcrowd the skewers: Leave some space between the pieces for even cooking.
- Preheat the grill: Make sure the grill is hot before adding the skewers.
- Oil the grill grates: This prevents the skewers from sticking.
- Turn the skewers frequently: This ensures even cooking and prevents burning.
- Don’t overcook the halloumi: It should be golden brown and slightly softened.
- Use high-quality ingredients: This will make a big difference in the flavor of the skewers.
- Get creative with your vegetables: Feel free to add other vegetables to the skewers, such as mushrooms, bell peppers, or eggplant.
- Experiment with different marinades: Try using different herbs, spices, or citrus juices to create your own unique marinade.
Variations:
- Add a balsamic glaze: Drizzle the grilled halloumi skewers with a balsamic glaze for a touch of sweetness and acidity.
- Serve with a dipping sauce: Offer a variety of dipping sauces, such as tzatziki, hummus, or a spicy yogurt sauce.
- Make it a vegetarian meal: Serve the skewers with a side of grilled vegetables or a vegetarian grain salad.
- Add some protein: Add grilled chicken or shrimp to the skewers for a heartier meal.
- Make it a dessert: Grill halloumi and pair it with grilled pineapple and a drizzle of honey for a sweet and savory dessert.
Health Benefits of Halloumi and Vegetables:
- Halloumi: Halloumi is a good source of protein and calcium.
- Bell peppers: Bell peppers are rich in vitamins A and C, as well as antioxidants.
- Zucchini: Zucchini is a good source of vitamins B6 and C, as well as potassium.
- Red onion: Red onion is a good source of antioxidants and fiber.
- Cherry tomatoes: Cherry tomatoes are rich in vitamins A and C, as well as lycopene.
Storage Instructions:
- Refrigerate: Store leftover grilled halloumi skewers in an airtight container in the refrigerator for up to 2 days.
- Reheat: Reheat the skewers gently in a skillet or microwave before serving.
Conclusion:
And there you have it! These Grilled Halloumi Skewers are more than just a recipe; they’re an invitation to a flavor party. Seriously, the combination of salty halloumi, sweet peppers, and tangy lemon is a total game-changer. If you’re looking for a quick, easy, and incredibly satisfying meal, snack, or appetizer, then look no further. I truly believe this is a must-try recipe that will quickly become a staple in your summer (or year-round!) cooking repertoire.
What makes these skewers so special? It’s the simplicity, really. Minimal ingredients, minimal prep time, and maximum flavor. The grilling process transforms the halloumi into a golden-brown, slightly crispy delight on the outside, while keeping it wonderfully soft and chewy on the inside. The vegetables char just enough to release their natural sweetness, creating a beautiful contrast of textures and tastes. Plus, the lemon-herb marinade adds a bright, zesty note that ties everything together perfectly.
But the best part? The versatility! These skewers are fantastic on their own as a light lunch or snack. You can also serve them as part of a larger Mediterranean spread, alongside hummus, pita bread, and a fresh salad. For a heartier meal, try serving them over a bed of couscous or quinoa. And if you’re feeling adventurous, you can even add grilled chicken or shrimp to the skewers for extra protein.
Looking for some variations? Go wild! Try adding different vegetables like zucchini, cherry tomatoes, or red onion. Experiment with different herbs in the marinade, such as oregano, thyme, or rosemary. For a spicy kick, add a pinch of red pepper flakes to the marinade or drizzle the finished skewers with a spicy chili oil. You could even brush them with a balsamic glaze after grilling for a touch of sweetness and acidity. The possibilities are endless!
I’m so confident that you’ll love these Grilled Halloumi Skewers. They’re perfect for a casual weeknight dinner, a backyard barbecue, or even a fancy cocktail party. They’re guaranteed to impress your friends and family, and they’re so easy to make that you’ll be whipping them up in no time.
So, what are you waiting for? Grab your halloumi, fire up the grill, and get cooking! I promise you won’t regret it. And when you do, please, please, please share your experience with me! I’d love to hear what you think of the recipe, what variations you tried, and how you served them. Tag me in your photos on social media, leave a comment below, or send me an email. I’m always eager to see your culinary creations and hear your feedback. Happy grilling! I can’t wait to see your version of these delicious skewers. Let me know if you have any questions, and most importantly, enjoy!
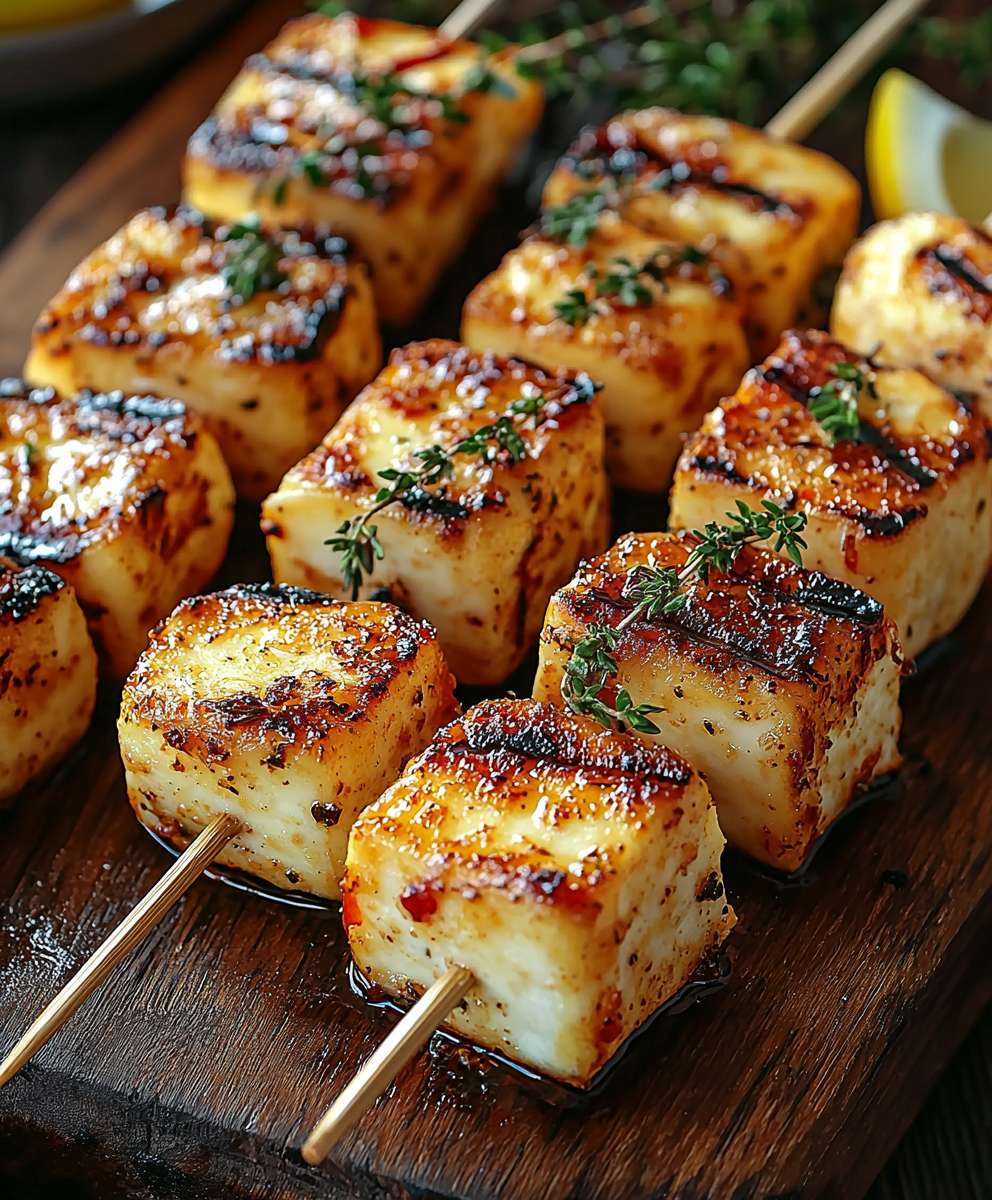
Grilled Halloumi Skewers: The Ultimate Summer Recipe
Colorful grilled halloumi skewers with marinated vegetables. An easy and delicious Mediterranean dish!
Ingredients
- 2 blocks (8 ounces each) Halloumi cheese, cut into 1-inch cubes
- 1 red bell pepper, cut into 1-inch pieces
- 1 yellow bell pepper, cut into 1-inch pieces
- 1 zucchini, cut into 1/2-inch thick rounds
- 1 red onion, cut into 1-inch wedges
- 1 pint cherry tomatoes
- 1/4 cup olive oil, plus more for grilling
- 2 tablespoons lemon juice
- 1 tablespoon dried oregano
- 1 teaspoon garlic powder
- 1/2 teaspoon red pepper flakes (optional)
- Salt and freshly ground black pepper to taste
- Wooden or metal skewers (if using wooden skewers, soak them in water for at least 30 minutes to prevent burning)
- Fresh parsley, chopped (for garnish)
Instructions
- Prepare Vegetables and Halloumi: Wash all vegetables thoroughly. Chop bell peppers into 1-inch pieces, zucchini into 1/2-inch thick rounds, and red onion into 1-inch wedges. Rinse cherry tomatoes. Pat halloumi dry and cut into 1-inch cubes.
- Marinate Vegetables (Optional): In a large bowl, combine bell peppers, zucchini, and red onion. In a small bowl, whisk together olive oil, lemon juice, oregano, garlic powder, and red pepper flakes (if using). Season with salt and pepper. Pour marinade over vegetables and toss. Let marinate for 15-30 minutes.
- Assemble Skewers: If using wooden skewers, soak them in water for at least 30 minutes. Thread vegetables and halloumi onto skewers in an alternating pattern (e.g., bell pepper, zucchini, halloumi, red onion, cherry tomato). Leave a little space between each piece.
- Grill Skewers: Preheat grill to medium-high heat. Clean and lightly oil the grates. Place skewers on the grill and cook for 2-3 minutes per side, or until halloumi is golden brown and slightly softened, and vegetables are tender-crisp. Turn frequently to prevent burning.
- Serve: Remove skewers from grill and place on a serving platter. Garnish with fresh chopped parsley. Serve immediately as an appetizer, snack, or main course.
Notes
- Soaking wooden skewers prevents burning.
- Patting the halloumi dry helps it sear properly.
- Don’t overcrowd the skewers for even cooking.
- Halloumi is salty, so season the vegetables generously.
- Marinating the vegetables enhances their flavor.
- Serve with couscous, quinoa, salad, or in pita bread with hummus and tzatziki.
- Leftovers can be stored in the refrigerator for up to 2 days and reheated.
- Add a balsamic glaze for a touch of sweetness and acidity.
- Serve with a dipping sauce, such as tzatziki, hummus, or a spicy yogurt sauce.
- Make it a vegetarian meal by serving the skewers with a side of grilled vegetables or a vegetarian grain salad.
- Add some protein by adding grilled chicken or shrimp to the skewers for a heartier meal.
- Make it a dessert by grilling halloumi and pairing it with grilled pineapple and a drizzle of honey for a sweet and savory dessert.