
Garlic Bread Rolls: Is there anything more comforting than the aroma of warm, garlicky bread wafting through your kitchen? I think not! These aren’t just your average rolls; they’re a flavor explosion in every bite, a perfect blend of soft, fluffy bread and that irresistible garlic butter that makes your taste buds sing.
Garlic bread, in its various forms, has been a culinary staple for centuries. Its roots can be traced back to ancient civilizations where bread was a fundamental part of the diet, and garlic was prized for its medicinal and flavor-enhancing properties. While the modern version we know and love likely evolved alongside the rise of Italian-American cuisine, the concept of flavoring bread with garlic is timeless and universal.
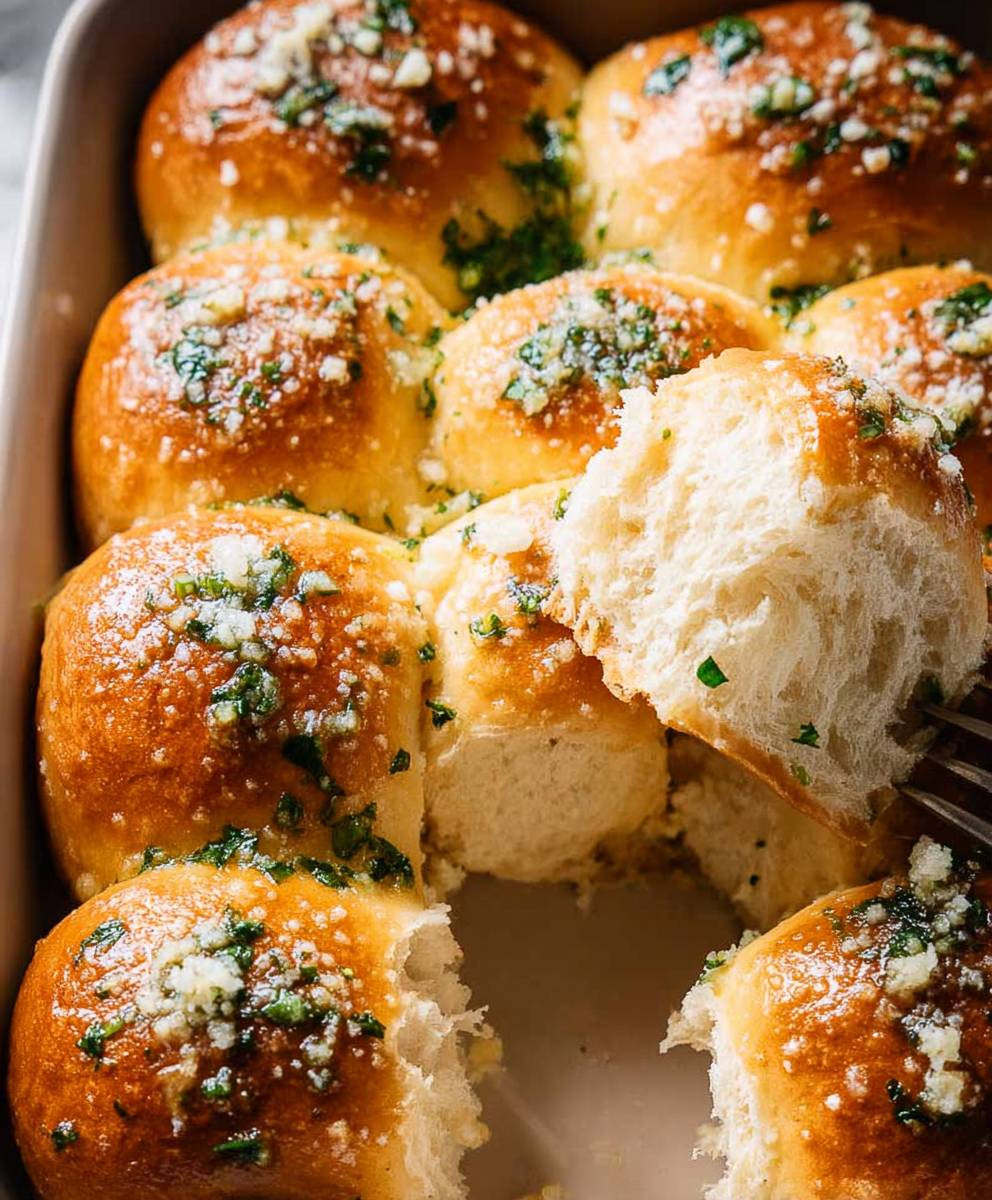
What makes garlic bread rolls so universally adored? It’s the perfect combination of textures – the slight crispness of the crust giving way to a soft, pillowy interior. Then there’s the taste: the pungent garlic, the rich butter, and a hint of herbs create a symphony of flavors that’s both comforting and exciting. Plus, they’re incredibly versatile! Serve them as a side with pasta, soup, or salad, or enjoy them as a satisfying snack on their own. They are also relatively easy to make, making them a winner in my book!

Ingredients:
- 1 package (0.25 ounce) active dry yeast
- 1/4 cup warm water (105-115 degrees F)
- 1 cup warm milk (105-115 degrees F)
- 1/4 cup granulated sugar
- 1 teaspoon salt
- 1/4 cup melted unsalted butter, plus more for brushing
- 3 1/4 – 3 3/4 cups all-purpose flour, plus more for dusting
- 6 cloves garlic, minced
- 1/4 cup finely chopped fresh parsley
- 1/4 cup grated Parmesan cheese
- 1/4 teaspoon garlic powder
- Pinch of red pepper flakes (optional)
Preparing the Dough:
- First, let’s activate the yeast. In a large bowl, dissolve the yeast in the 1/4 cup of warm water. Make sure the water isn’t too hot, or it will kill the yeast. Let it stand for about 5-10 minutes, or until it gets foamy. This means the yeast is alive and kicking!
- Next, add the warm milk, sugar, salt, and melted butter to the yeast mixture. Stir everything together until it’s well combined. The sugar helps feed the yeast, and the butter adds richness to the dough.
- Now, it’s time to add the flour. Start by adding 3 1/4 cups of flour to the wet ingredients. Mix it with a wooden spoon or a dough hook attachment on your stand mixer. If the dough is still too sticky, gradually add more flour, a tablespoon at a time, until it forms a soft, slightly sticky dough. Be careful not to add too much flour, or the rolls will be dry.
- Turn the dough out onto a lightly floured surface and knead it for about 5-7 minutes, or until it’s smooth and elastic. If you’re using a stand mixer, knead it with the dough hook for about 5 minutes. The dough should be soft and pliable.
- Place the dough in a lightly greased bowl, turning it to coat all sides. Cover the bowl with plastic wrap or a clean kitchen towel and let it rise in a warm place for about 1-1.5 hours, or until it has doubled in size. This is where the magic happens! The yeast is working its wonders, creating those lovely air pockets that make the rolls light and fluffy.
Making the Garlic Butter:
- While the dough is rising, let’s make the garlic butter. In a small bowl, combine the minced garlic, chopped parsley, Parmesan cheese, garlic powder, and red pepper flakes (if using) with the remaining 1/4 cup of melted butter. Mix everything together until it’s well combined. This garlic butter is what gives these rolls their amazing flavor!
Shaping and Filling the Rolls:
- Once the dough has doubled in size, punch it down gently to release the air. Turn it out onto a lightly floured surface and divide it into 12 equal pieces.
- Roll each piece of dough into a ball. Then, flatten each ball slightly into a small disc.
- Spoon about 1 teaspoon of the garlic butter mixture onto the center of each disc.
- Bring the edges of the dough up and pinch them together to seal the filling inside. Make sure the rolls are sealed tightly, or the garlic butter will leak out during baking.
- Place the filled rolls, seam-side down, in a greased 9×13 inch baking dish. Arrange them close together, but not too crowded.
Second Rise and Baking:
- Cover the baking dish with plastic wrap or a clean kitchen towel and let the rolls rise again in a warm place for about 30 minutes, or until they have puffed up slightly.
- While the rolls are rising for the second time, preheat your oven to 375 degrees F (190 degrees C).
- Once the rolls have risen, brush the tops with melted butter. This will give them a beautiful golden-brown color and a delicious buttery flavor.
- Bake the rolls for about 20-25 minutes, or until they are golden brown and cooked through. To check for doneness, insert a toothpick into the center of a roll. If it comes out clean, the rolls are done.
Serving:
- Remove the rolls from the oven and let them cool slightly in the baking dish before serving.
- Serve warm and enjoy! These garlic bread rolls are perfect as a side dish with pasta, soup, or salad. They’re also great on their own as a snack.
Tips and Variations:
- For extra cheesy rolls: Sprinkle some shredded mozzarella or cheddar cheese on top of the rolls before baking.
- For a spicier kick: Add more red pepper flakes to the garlic butter.
- For a different herb flavor: Use Italian seasoning or dried oregano instead of parsley.
- Make ahead: You can prepare the dough ahead of time and store it in the refrigerator overnight. Just let it come to room temperature before shaping and baking.
- Freezing: Baked rolls can be frozen for up to 2 months. Thaw them completely before reheating.
Troubleshooting:
- Dough not rising: Make sure your yeast is fresh and that the water and milk are not too hot. If the liquid is too hot, it will kill the yeast. Also, make sure you’re letting the dough rise in a warm place.
- Rolls are too dry: Be careful not to add too much flour to the dough. The dough should be soft and slightly sticky.
- Garlic butter leaking out: Make sure you seal the rolls tightly after filling them with the garlic butter.
Enjoy your homemade garlic bread rolls! I hope you love them as much as I do!
Conclusion:
And there you have it! These Garlic Bread Rolls are so much more than just a side dish; they’re a flavor explosion waiting to happen. I truly believe this recipe is a must-try for anyone who loves the comforting aroma and taste of garlic bread, but wants something a little more special, a little more… elevated. The soft, pillowy texture of the rolls combined with the intensely garlicky, buttery topping is simply irresistible. Trust me, once you’ve tasted these, you’ll never look at store-bought garlic bread the same way again.
What makes these rolls so special? It’s the perfect balance of flavors and textures. The slight sweetness of the dough complements the savory garlic and herbs beautifully. Plus, the individual roll format makes them perfect for portion control (though I can’t guarantee you’ll only eat one!). They’re also incredibly versatile.
Serving Suggestions and Variations:
Think of these Garlic Bread Rolls as a blank canvas for your culinary creativity! Serve them warm alongside your favorite pasta dishes, like spaghetti Bolognese or creamy Alfredo. They’re also fantastic with soups and stews, perfect for soaking up all that delicious broth. Imagine dipping one of these into a hearty bowl of tomato soup on a chilly evening – pure comfort food!
But don’t stop there! Get creative with your toppings. For a cheesy twist, sprinkle some grated Parmesan or mozzarella cheese over the garlic butter before baking. Add a pinch of red pepper flakes for a little heat. Or, try incorporating some fresh herbs like rosemary or thyme for a more sophisticated flavor profile. You could even add some sun-dried tomatoes or olives for a Mediterranean-inspired version.
For a truly decadent experience, try brushing the baked rolls with a little extra melted garlic butter right before serving. And if you have any leftover rolls (which is unlikely!), they’re delicious toasted the next day and served with eggs for breakfast.
These rolls are also a fantastic addition to any party or gathering. They’re easy to make ahead of time and can be reheated just before serving. They’re always a crowd-pleaser and are sure to be a hit with both kids and adults.
I’ve poured my heart into perfecting this recipe, and I’m confident that you’ll love it as much as I do. The aroma alone while they’re baking is enough to make your mouth water! The best part is that they are surprisingly easy to make, even for beginner bakers. The recipe is straightforward, and I’ve included plenty of tips and tricks to ensure your success.
So, what are you waiting for? Gather your ingredients, preheat your oven, and get ready to experience the ultimate Garlic Bread Rolls. I promise you won’t be disappointed.
I’m so excited for you to try this recipe! Once you’ve made these amazing rolls, I’d love to hear about your experience. Did you try any variations? What did you serve them with? Share your photos and comments below! Let me know what you think, and don’t forget to tag me in your social media posts. Happy baking! I can’t wait to see your delicious creations.
Garlic Bread Rolls: The Ultimate Guide to Baking Delicious Rolls
Soft and fluffy homemade garlic bread rolls filled with a savory garlic butter. Perfect as a side dish or a delicious snack!
Ingredients
- 1 package (0.25 ounce) active dry yeast
- 1/4 cup warm water (105-115 degrees F)
- 1 cup warm milk (105-115 degrees F)
- 1/4 cup granulated sugar
- 1 teaspoon salt
- 1/4 cup melted unsalted butter, plus more for brushing
- 3 1/4 – 3 3/4 cups all-purpose flour, plus more for dusting
- 6 cloves garlic, minced
- 1/4 cup finely chopped fresh parsley
- 1/4 cup grated Parmesan cheese
- 1/4 teaspoon garlic powder
- Pinch of red pepper flakes (optional)
Instructions
- Activate the Yeast: In a large bowl, dissolve the yeast in the 1/4 cup of warm water. Let it stand for 5-10 minutes, or until foamy.
- Combine Wet Ingredients: Add the warm milk, sugar, salt, and 1/4 cup melted butter to the yeast mixture. Stir until well combined.
- Add Flour: Gradually add 3 1/4 cups of flour to the wet ingredients. Mix with a wooden spoon or dough hook. If the dough is too sticky, add more flour, 1 tablespoon at a time, until a soft, slightly sticky dough forms.
- Knead the Dough: Turn the dough out onto a lightly floured surface and knead for 5-7 minutes, or until smooth and elastic. Alternatively, knead with a dough hook for 5 minutes.
- First Rise: Place the dough in a lightly greased bowl, turning to coat. Cover with plastic wrap or a towel and let rise in a warm place for 1-1.5 hours, or until doubled in size.
- Make Garlic Butter: While the dough is rising, in a small bowl, combine the minced garlic, chopped parsley, Parmesan cheese, garlic powder, and red pepper flakes (if using) with the remaining 1/4 cup of melted butter. Mix well.
- Shape the Rolls: Once the dough has doubled, punch it down. Turn it out onto a lightly floured surface and divide into 12 equal pieces.
- Fill the Rolls: Roll each piece into a ball, then flatten into a small disc. Spoon about 1 teaspoon of the garlic butter mixture onto the center of each disc.
- Seal the Rolls: Bring the edges of the dough up and pinch them together to seal the filling inside.
- Arrange in Baking Dish: Place the filled rolls, seam-side down, in a greased 9×13 inch baking dish. Arrange them close together.
- Second Rise: Cover the baking dish with plastic wrap or a towel and let the rolls rise again in a warm place for about 30 minutes, or until puffed up slightly.
- Preheat Oven: While the rolls are rising for the second time, preheat your oven to 375 degrees F (190 degrees C).
- Brush with Butter: Once the rolls have risen, brush the tops with melted butter.
- Bake: Bake the rolls for about 20-25 minutes, or until golden brown and cooked through. Check for doneness with a toothpick.
- Cool and Serve: Remove the rolls from the oven and let them cool slightly in the baking dish before serving. Serve warm.
Notes
- For extra cheesy rolls: Sprinkle some shredded mozzarella or cheddar cheese on top of the rolls before baking.
- For a spicier kick: Add more red pepper flakes to the garlic butter.
- For a different herb flavor: Use Italian seasoning or dried oregano instead of parsley.
- Make ahead: You can prepare the dough ahead of time and store it in the refrigerator overnight. Just let it come to room temperature before shaping and baking.
- Freezing: Baked rolls can be frozen for up to 2 months. Thaw them completely before reheating.
- Dough not rising: Make sure your yeast is fresh and that the water and milk are not too hot. If the liquid is too hot, it will kill the yeast. Also, make sure you’re letting the dough rise in a warm place.
- Rolls are too dry: Be careful not to add too much flour to the dough. The dough should be soft and slightly sticky.
- Garlic butter leaking out: Make sure you seal the rolls tightly after filling them with the garlic butter.