Cider pumpkin waffles: the very words conjure up images of crisp autumn mornings, the scent of cinnamon and spice filling the air, and a stack of golden-brown deliciousness waiting to be devoured. Have you ever wondered how something so simple could taste so incredibly comforting? These aren’t just waffles; they’re a celebration of fall flavors, a warm hug on a plate, and a guaranteed way to start your day with a smile.
While the exact origins of waffles are debated, their evolution has been a delicious journey through history. From medieval wafers cooked over open fires to the electric waffle irons of today, this breakfast staple has captured hearts (and stomachs!) worldwide. Adding pumpkin and cider, however, is a distinctly autumnal twist, likely born from the abundance of these ingredients during harvest season. It’s a modern adaptation that perfectly blends tradition with seasonal flavors.
People adore cider pumpkin waffles for a multitude of reasons. The subtle sweetness of the pumpkin, combined with the tangy apple cider, creates a flavor profile that’s both comforting and exciting. The texture is equally appealing – a crispy exterior giving way to a soft, fluffy interior. And let’s not forget the convenience! These waffles are surprisingly easy to make, perfect for a weekend brunch or a quick weekday breakfast. Whether you’re a seasoned chef or a kitchen novice, you can whip up a batch of these delightful treats in no time. Get ready to experience the magic of fall with every bite!

Ingredients:
- For the Waffles:
- 2 cups all-purpose flour
- 2 teaspoons baking powder
- 1 teaspoon baking soda
- 1/2 teaspoon salt
- 1 teaspoon ground cinnamon
- 1/2 teaspoon ground nutmeg
- 1/4 teaspoon ground cloves
- 1/2 cup packed light brown sugar
- 1 1/2 cups apple cider
- 1 cup pumpkin puree (not pumpkin pie filling)
- 1/2 cup milk
- 1/4 cup (1/2 stick) unsalted butter, melted
- 2 large eggs, lightly beaten
- 1 teaspoon vanilla extract
- Optional Toppings:
- Whipped cream
- Maple syrup
- Chopped pecans or walnuts
- Caramel sauce
- Apple slices, sautéed or fresh
- Cinnamon sugar
Preparing the Waffle Batter
Alright, let’s get started on making these amazing cider pumpkin waffles! The first step is creating the perfect batter. Don’t worry, it’s easier than you think!
- Combine the Dry Ingredients: In a large bowl, whisk together the flour, baking powder, baking soda, salt, cinnamon, nutmeg, and cloves. Make sure everything is evenly distributed. This ensures that the spices and leavening agents are properly incorporated into the batter, giving you a consistent flavor and texture.
- Add the Brown Sugar: Stir in the brown sugar until it’s well combined with the dry ingredients. The brown sugar adds a touch of sweetness and a lovely molasses flavor that complements the pumpkin and cider perfectly.
- Whisk in the Wet Ingredients: In a separate bowl, whisk together the apple cider, pumpkin puree, milk, melted butter, eggs, and vanilla extract. Make sure the eggs are lightly beaten before adding them to the mixture. This helps to create a smooth and even batter.
- Combine Wet and Dry: Pour the wet ingredients into the bowl with the dry ingredients. Gently fold the wet ingredients into the dry ingredients until just combined. Be careful not to overmix the batter! Overmixing can develop the gluten in the flour, resulting in tough waffles. A few lumps are perfectly fine.
- Let the Batter Rest (Optional but Recommended): Cover the bowl with plastic wrap and let the batter rest for 5-10 minutes. This allows the gluten to relax, resulting in lighter and fluffier waffles. While this step is optional, I highly recommend it for the best results.
Cooking the Waffles
Now comes the fun part – cooking the waffles! Make sure your waffle iron is preheated and ready to go.
- Preheat Your Waffle Iron: Preheat your waffle iron according to the manufacturer’s instructions. Most waffle irons have an indicator light that will let you know when it’s ready.
- Grease the Waffle Iron: Lightly grease the waffle iron with cooking spray or melted butter. This will prevent the waffles from sticking and make them easier to remove. I prefer using cooking spray for convenience, but melted butter adds a nice flavor.
- Pour the Batter: Pour the batter onto the hot waffle iron, using the amount recommended by the manufacturer. Be careful not to overfill the waffle iron, as the batter will expand during cooking.
- Cook the Waffles: Close the waffle iron and cook the waffles according to the manufacturer’s instructions. The cooking time will vary depending on your waffle iron, but it usually takes about 3-5 minutes. The waffles are done when they are golden brown and crispy.
- Remove the Waffles: Carefully remove the waffles from the waffle iron using a fork or tongs. Be careful not to scratch the surface of the waffle iron.
- Keep Waffles Warm (Optional): If you’re making a large batch of waffles, you can keep them warm in a preheated oven (200°F or 93°C) until you’re ready to serve them. Place the waffles on a wire rack in a single layer to prevent them from getting soggy.
Serving and Enjoying Your Cider Pumpkin Waffles
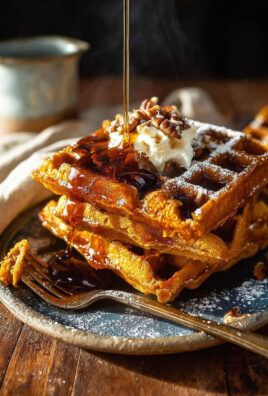
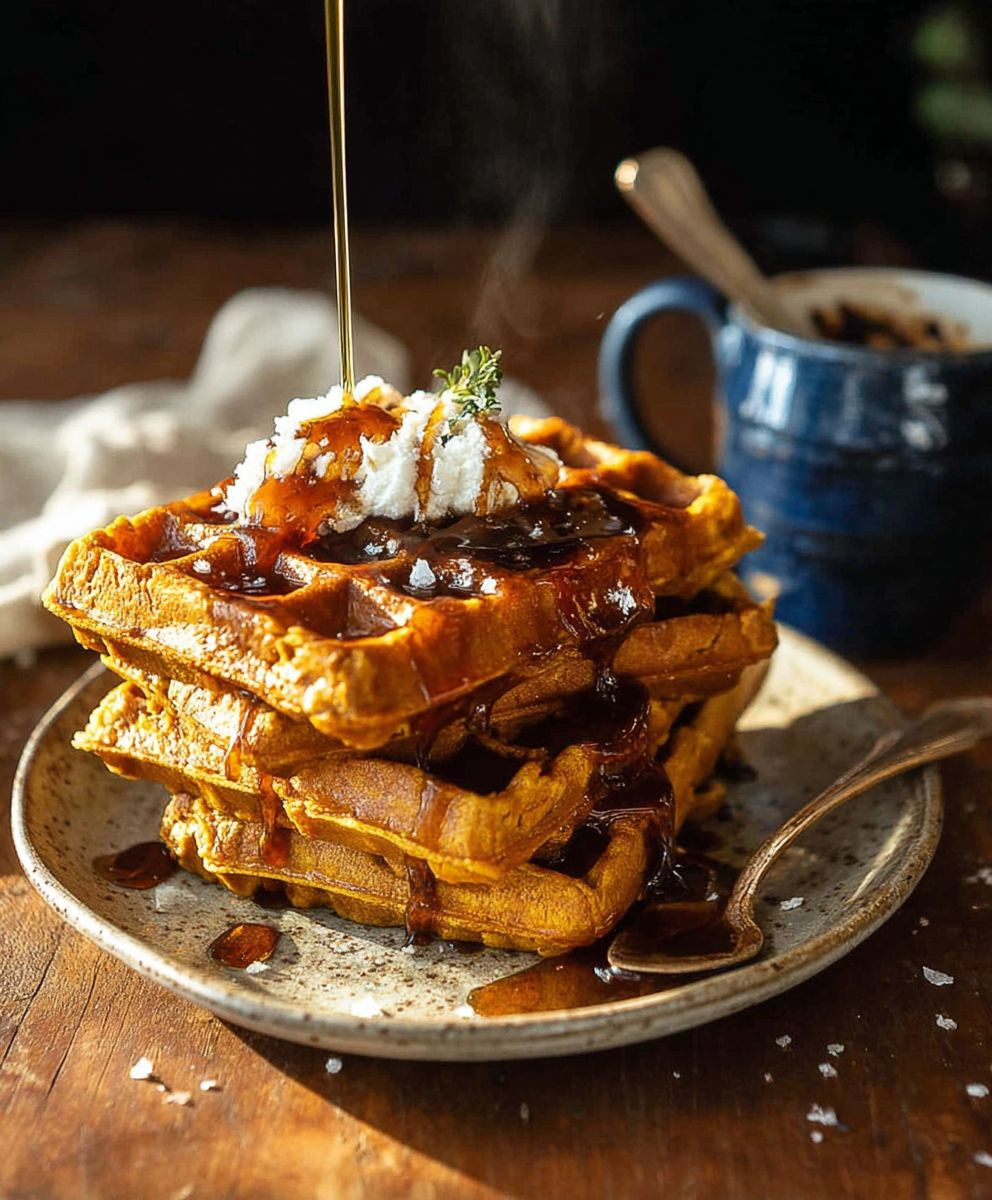
The best part! Now it’s time to enjoy the fruits (or should I say, pumpkins?) of your labor. Get creative with your toppings and make these waffles your own!
- Add Your Favorite Toppings: Serve the waffles immediately with your favorite toppings. Some popular choices include whipped cream, maple syrup, chopped pecans or walnuts, caramel sauce, apple slices, and cinnamon sugar.
- Enjoy! Dig in and enjoy your delicious cider pumpkin waffles! They’re perfect for a weekend brunch, a special breakfast, or even a dessert.
Tips and Variations
Want to customize your waffles even further? Here are a few ideas:
- Add Chocolate Chips: Stir in 1/2 cup of chocolate chips to the batter for a chocolatey twist.
- Use Different Spices: Experiment with different spices, such as ginger or cardamom, to create a unique flavor profile.
- Make Gluten-Free Waffles: Substitute the all-purpose flour with a gluten-free flour blend. Be sure to use a blend that is designed for baking.
- Add Nuts: Stir in 1/2 cup of chopped nuts, such as pecans or walnuts, to the batter for added texture and flavor.
- Make Mini Waffles: Use a mini waffle iron to make smaller, bite-sized waffles. These are perfect for parties or snacks.
- Apple Cider Reduction: For an even more intense apple cider flavor, reduce 1 cup of apple cider in a saucepan over medium heat until it’s reduced to about 1/4 cup. Let it cool slightly and then whisk it into the batter.
- Brown Butter: Brown the butter before melting it for a nutty and rich flavor. Be careful not to burn the butter.
- Pumpkin Spice Latte Waffles: Add 1/4 cup of brewed espresso or strong coffee to the batter, along with an extra 1/4 teaspoon of pumpkin pie spice.
Storing Leftover Waffles
If you happen to have any leftover waffles (which is unlikely!), you can store them in the refrigerator or freezer.
- Refrigerating: Let the waffles cool completely and then store them in an airtight container in the refrigerator for up to 3 days.
- Freezing: Let the waffles cool completely and then place them in a single layer on a baking sheet. Freeze for about 30 minutes, or until they are firm. Then, transfer the waffles to a freezer bag or airtight container and store them in the freezer for up to 2 months.
Reheating Waffles
There are several ways to reheat waffles:
- Toaster: The toaster is a quick and easy way to reheat waffles. Simply toast them until they are warm and crispy.
- Oven: Preheat your oven to 350°F (175°C). Place the waffles on a baking sheet and bake for about 5-10 minutes, or until they are warm.
- Microwave: The microwave is the quickest way to reheat waffles, but they may not be as crispy. Microwave them for about 30-60 seconds, or until they are warm.
- Waffle Iron: You can even reheat waffles in the waffle iron! This will help to crisp them up and give them a fresh-out-of-the-iron taste.
Troubleshooting
Sometimes things don’t go exactly as planned. Here are a few common waffle-making problems and how to fix them:
- Waffles are sticking to the waffle iron: Make sure you are greasing the waffle iron properly. You may also need to adjust the cooking time.
- Waffles are not cooking evenly: Make sure your waffle iron is preheated properly and that you are using the correct amount of batter.
- Waffles are too dense: Be careful not to overmix the batter. Overmixing can develop the gluten in the flour, resulting in tough waffles.
- Waffles are too dry: Add a little more liquid to the batter.
- Waffles are not crispy: Cook the waffles for a longer period of time. You can also try adding a little bit of sugar to the batter.
I hope you enjoy making these cider pumpkin waffles as much as I do! They’re a perfect way to celebrate the flavors of fall. Happy
Conclusion:
And there you have it! These cider pumpkin waffles are more than just breakfast; they’re a warm, comforting hug on a plate, perfect for crisp autumn mornings or cozy weekend brunches. I truly believe this recipe is a must-try because it perfectly balances the sweetness of pumpkin with the tangy depth of apple cider, creating a flavor profile that’s both familiar and excitingly unique. The texture is divine – crispy on the outside, fluffy and tender on the inside. What more could you ask for?
But the best part? It’s incredibly easy to make! Even if you’re not a seasoned baker, you’ll find this recipe straightforward and satisfying. The aroma alone, as the waffles cook, is enough to make your kitchen feel like a fall wonderland. Trust me, your family and friends will thank you for this one.
Now, let’s talk serving suggestions and variations, because the possibilities are endless! For a classic touch, top your cider pumpkin waffles with a dollop of whipped cream, a drizzle of maple syrup, and a sprinkle of cinnamon. If you’re feeling adventurous, try a pecan praline sauce or a caramel drizzle. Fresh berries, like raspberries or cranberries, add a burst of freshness and color.
Looking for something a little more substantial? Consider adding a scoop of vanilla ice cream for a decadent dessert waffle. Or, for a savory-sweet twist, top them with fried chicken for a truly unforgettable brunch experience. You could even crumble some crispy bacon on top for a salty, smoky contrast to the sweetness of the waffles.
For variations, you can easily adapt this recipe to suit your preferences. If you’re not a fan of apple cider, you can substitute it with apple juice or even pumpkin spice latte. For a richer flavor, use brown butter instead of melted butter. And if you’re looking to add some extra texture, try incorporating chopped pecans or walnuts into the batter.
If you’re gluten-free, simply swap the all-purpose flour with a gluten-free blend. I’ve tried it with several different blends, and they all work beautifully. Just be sure to add a little extra liquid if the batter seems too thick.
Don’t be afraid to experiment and make this recipe your own! That’s the beauty of cooking – it’s all about creating something that you love.
I’m so confident that you’ll adore these cider pumpkin waffles that I can’t wait to hear about your experience. Please, give this recipe a try and let me know what you think in the comments below. Share your photos on social media and tag me so I can see your creations! I’m always looking for new and exciting ways to enjoy this recipe, so feel free to share your own variations and serving suggestions as well. Happy waffle-making! I hope this becomes a new fall favorite in your home, just as it has in mine. I am sure you will love this recipe for cider pumpkin waffles!
Cider Pumpkin Waffles: The Ultimate Fall Breakfast Recipe
Fluffy and flavorful cider pumpkin waffles, perfect for fall! These waffles are packed with warm spices and the delicious flavors of apple cider and pumpkin.
Ingredients
- 2 cups all-purpose flour
- 2 teaspoons baking powder
- 1 teaspoon baking soda
- 1/2 teaspoon salt
- 1 teaspoon ground cinnamon
- 1/2 teaspoon ground nutmeg
- 1/4 teaspoon ground cloves
- 1/2 cup packed light brown sugar
- 1 1/2 cups apple cider
- 1 cup pumpkin puree (not pumpkin pie filling)
- 1/2 cup milk
- 1/4 cup (1/2 stick) unsalted butter, melted
- 2 large eggs, lightly beaten
- 1 teaspoon vanilla extract
- Whipped cream
- Maple syrup
- Chopped pecans or walnuts
- Caramel sauce
- Apple slices, sautéed or fresh
- Cinnamon sugar
Instructions
- Combine Dry Ingredients: In a large bowl, whisk together the flour, baking powder, baking soda, salt, cinnamon, nutmeg, and cloves.
- Add Brown Sugar: Stir in the brown sugar until well combined with the dry ingredients.
- Whisk Wet Ingredients: In a separate bowl, whisk together the apple cider, pumpkin puree, milk, melted butter, eggs, and vanilla extract.
- Combine Wet and Dry: Pour the wet ingredients into the bowl with the dry ingredients. Gently fold the wet ingredients into the dry ingredients until just combined. Be careful not to overmix.
- Rest Batter (Optional): Cover the bowl with plastic wrap and let the batter rest for 5-10 minutes.
- Preheat Waffle Iron: Preheat your waffle iron according to the manufacturer’s instructions.
- Grease Waffle Iron: Lightly grease the waffle iron with cooking spray or melted butter.
- Pour Batter: Pour the batter onto the hot waffle iron, using the amount recommended by the manufacturer.
- Cook Waffles: Close the waffle iron and cook the waffles according to the manufacturer’s instructions (usually 3-5 minutes), until golden brown and crispy.
- Remove Waffles: Carefully remove the waffles from the waffle iron.
- Keep Waffles Warm (Optional): If making a large batch, keep waffles warm in a preheated oven (200°F or 93°C) on a wire rack.
- Add Toppings: Serve immediately with your favorite toppings.
- Enjoy!
Notes
- Resting the batter for 5-10 minutes allows the gluten to relax, resulting in lighter and fluffier waffles.
- Be careful not to overmix the batter, as this can lead to tough waffles. A few lumps are okay.
- Cooking times may vary depending on your waffle iron.
- For an even more intense apple cider flavor, reduce 1 cup of apple cider in a saucepan over medium heat until it’s reduced to about 1/4 cup. Let it cool slightly and then whisk it into the batter.
- Leftover waffles can be stored in the refrigerator for up to 3 days or frozen for up to 2 months. Reheat in a toaster, oven, microwave, or waffle iron.