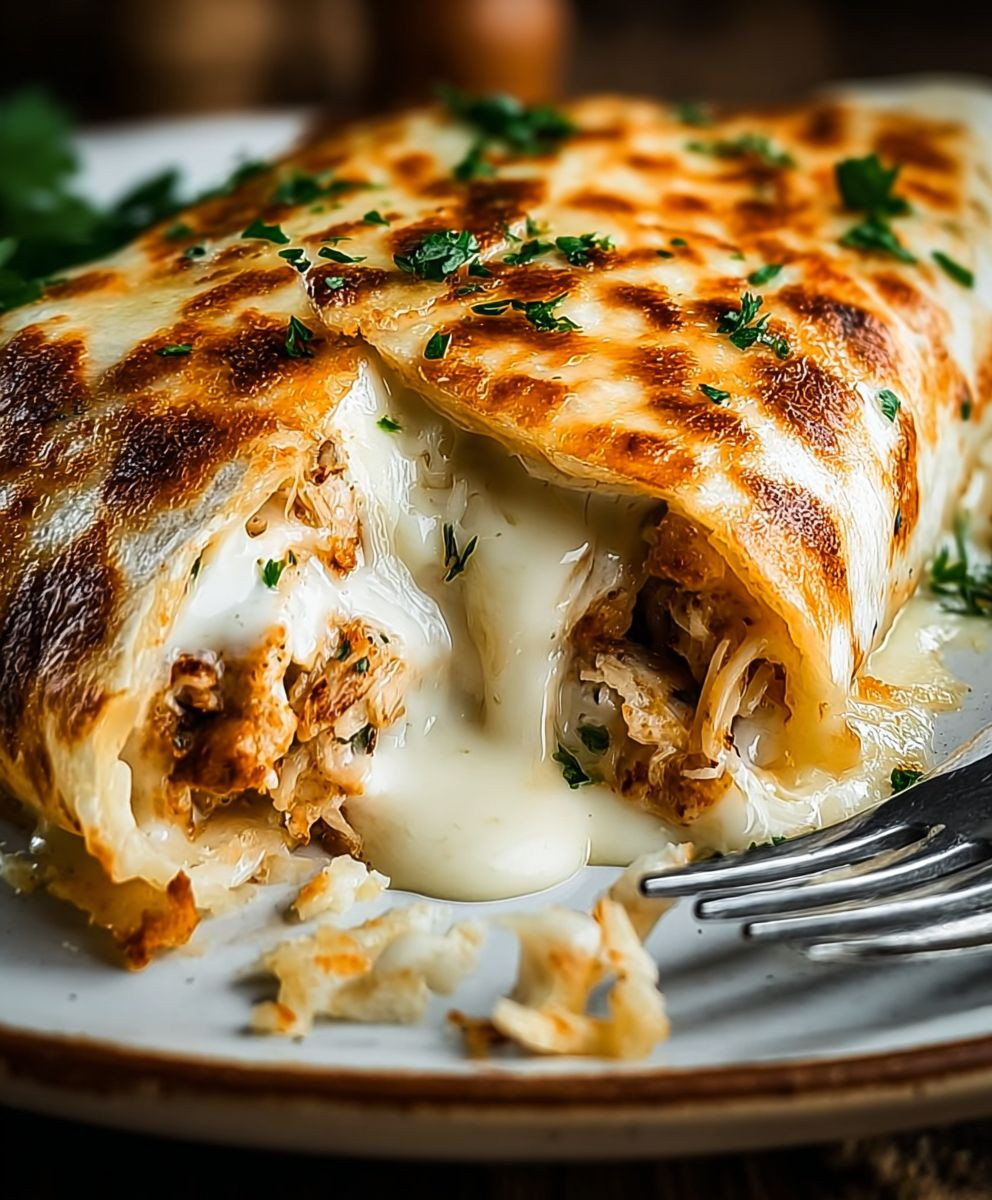
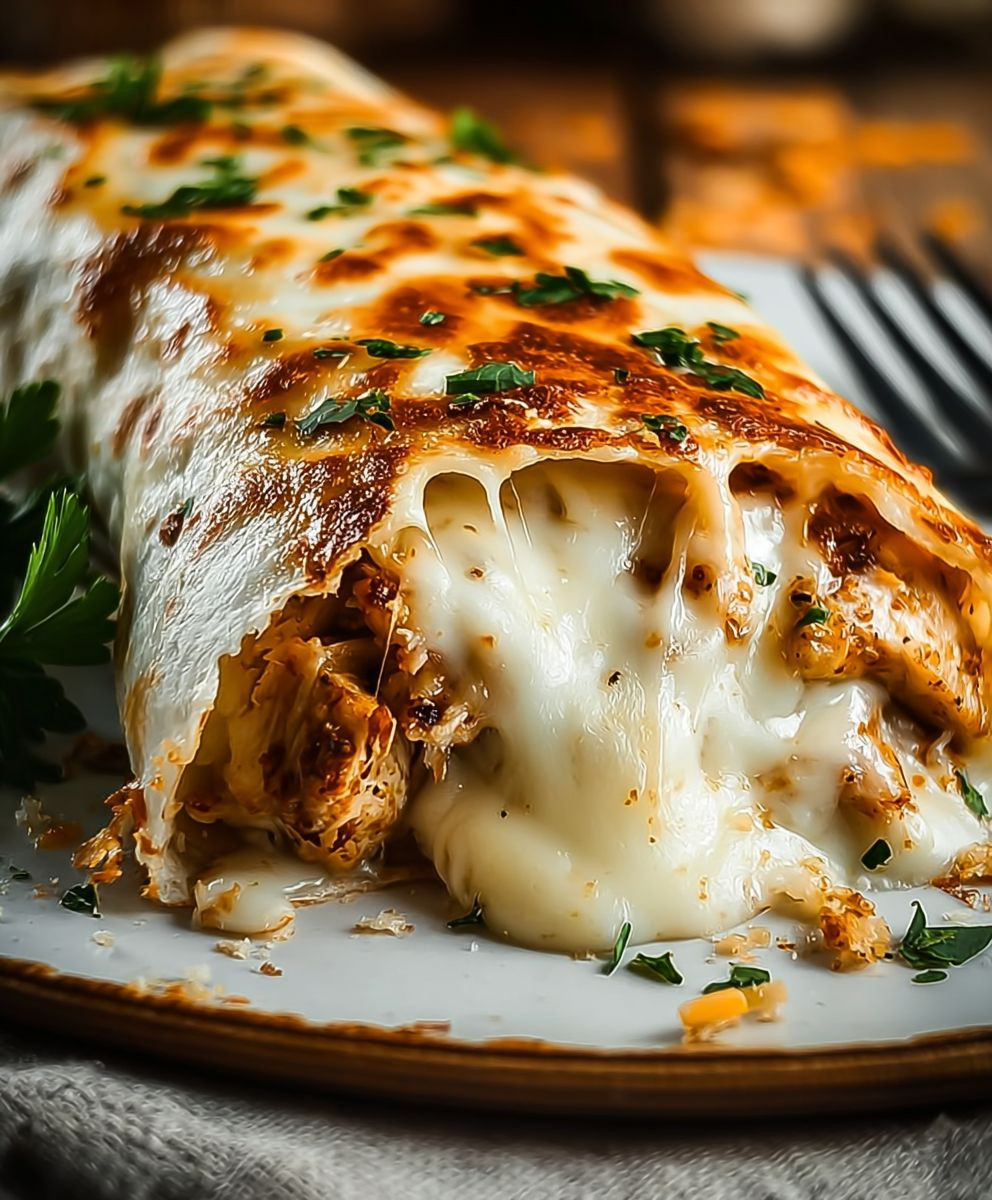
Cheesy Garlic Chicken Wraps: Prepare to be amazed by this incredibly flavorful and satisfying meal that’s ready in minutes! Imagine tender, juicy chicken bursting with garlicky goodness, enveloped in melted cheese, and all snuggled inside a warm, soft tortilla. Sounds divine, right?
While the exact origins of the chicken wrap are somewhat debated, the concept of wrapping savory fillings in flatbreads has existed for centuries across various cultures. From Middle Eastern shawarma to Mexican burritos, the idea of portable, delicious meals is universally appealing. Our Cheesy Garlic Chicken Wraps take this concept to a whole new level of deliciousness.
What makes these wraps so irresistible? It’s the perfect combination of flavors and textures. The savory garlic chicken is balanced by the creamy, melted cheese, and the soft tortilla provides the perfect vessel for all that goodness. Plus, they’re incredibly convenient! Whether you’re looking for a quick and easy weeknight dinner, a satisfying lunch on the go, or a crowd-pleasing appetizer, these wraps are a guaranteed hit. The ease of preparation and the delightful taste make Cheesy Garlic Chicken Wraps a family favorite.
Ingredients:
- For the Chicken:
- 2 large boneless, skinless chicken breasts (about 1.5 lbs total)
- 1 tablespoon olive oil
- 1 teaspoon garlic powder
- 1 teaspoon onion powder
- 1/2 teaspoon dried oregano
- 1/4 teaspoon red pepper flakes (optional, for a little heat)
- Salt and freshly ground black pepper to taste
- For the Garlic Sauce:
- 1/2 cup mayonnaise
- 1/4 cup sour cream (or Greek yogurt for a tangier flavor)
- 3 cloves garlic, minced
- 1 tablespoon lemon juice
- 1 tablespoon chopped fresh parsley
- 1/4 teaspoon salt
- 1/8 teaspoon black pepper
- For the Wraps:
- 4 large flour tortillas (10-12 inch diameter)
- 1 cup shredded mozzarella cheese
- 1/2 cup shredded cheddar cheese
- 1/4 cup grated Parmesan cheese
- 1/4 cup chopped fresh cilantro (optional, for garnish)
- Optional toppings: diced tomatoes, shredded lettuce, sliced avocado
Preparing the Chicken
Alright, let’s get started with the star of our show – the chicken! This is where we build the flavor foundation for our cheesy garlic chicken wraps. Don’t worry, it’s super easy!
- Prep the Chicken: First, we need to make sure our chicken breasts are ready to absorb all those delicious spices. Pat the chicken breasts dry with paper towels. This helps them get a nice sear later on. If your chicken breasts are particularly thick, you can slice them horizontally in half to create thinner cutlets. This will help them cook more evenly and quickly.
- Season the Chicken: In a small bowl, combine the garlic powder, onion powder, dried oregano, red pepper flakes (if using), salt, and pepper. Mix well to ensure all the spices are evenly distributed. Now, generously rub this spice mixture all over both sides of the chicken breasts. Make sure every nook and cranny is covered!
- Sear the Chicken: Heat the olive oil in a large skillet over medium-high heat. You want the skillet to be nice and hot before adding the chicken. Once the oil is shimmering, carefully place the seasoned chicken breasts in the skillet. Don’t overcrowd the pan; if necessary, cook the chicken in batches. Sear the chicken for about 4-5 minutes per side, or until it’s nicely browned and cooked through. The internal temperature should reach 165°F (74°C). Use a meat thermometer to be sure!
- Rest and Shred the Chicken: Once the chicken is cooked, remove it from the skillet and place it on a cutting board. Let it rest for about 5-10 minutes. This allows the juices to redistribute, resulting in more tender and flavorful chicken. After resting, use two forks to shred the chicken into bite-sized pieces. You can also use your hands if you prefer, but be careful – it might still be hot!
Making the Garlic Sauce
Now, let’s whip up the creamy, dreamy garlic sauce that will tie everything together. This sauce is so good, you might want to make extra for dipping!
- Combine the Ingredients: In a medium bowl, whisk together the mayonnaise, sour cream (or Greek yogurt), minced garlic, lemon juice, chopped fresh parsley, salt, and pepper. Make sure everything is well combined and the sauce is smooth and creamy.
- Adjust to Taste: Taste the sauce and adjust the seasonings as needed. If you want a more pronounced garlic flavor, add another clove of minced garlic. If you prefer a tangier sauce, add a little more lemon juice.
- Chill (Optional): For the best flavor, cover the bowl and refrigerate the garlic sauce for at least 30 minutes to allow the flavors to meld. However, if you’re short on time, you can use it immediately.
Assembling the Wraps
Okay, we’re in the home stretch! It’s time to assemble our cheesy garlic chicken wraps and get ready to enjoy a delicious meal.
- Warm the Tortillas (Optional): This step is optional, but I highly recommend it. Warming the tortillas makes them more pliable and less likely to tear when you’re rolling them. You can warm them in a dry skillet over medium heat for about 15-20 seconds per side, or wrap them in a damp paper towel and microwave them for about 30 seconds.
- Spread the Garlic Sauce: Lay one tortilla flat on a clean surface. Spread a generous amount of the garlic sauce evenly over the tortilla, leaving a small border around the edges.
- Add the Cheese: Sprinkle a layer of mozzarella cheese, cheddar cheese, and Parmesan cheese over the garlic sauce. Don’t be shy with the cheese – we want these wraps to be extra cheesy!
- Add the Chicken: Top the cheese with a generous portion of the shredded chicken. Spread the chicken evenly over the cheese.
- Add Optional Toppings: If you’re using any optional toppings like diced tomatoes, shredded lettuce, or sliced avocado, now’s the time to add them.
- Roll the Wrap: To roll the wrap, fold in the sides of the tortilla towards the center. Then, starting from the bottom, tightly roll the tortilla up and over the filling, like you’re rolling a burrito.
- Repeat: Repeat steps 2-6 with the remaining tortillas and filling.
Cooking the Wraps (Optional)
This step is optional, but it adds a nice touch of warmth and melts the cheese even more. If you prefer, you can skip this step and enjoy the wraps cold or at room temperature.
- Heat a Skillet: Heat a large skillet over medium heat. You can lightly grease the skillet with cooking spray or a little bit of olive oil.
- Cook the Wraps: Place the assembled wraps in the skillet, seam-side down. Cook for about 2-3 minutes per side, or until the tortillas are golden brown and crispy and the cheese is melted and gooey.
- Serve: Remove the wraps from the skillet and let them cool slightly before slicing them in half. Garnish with chopped fresh cilantro, if desired. Serve immediately and enjoy!
Tips and Variations:
- Spice it up: Add a pinch of cayenne pepper to the garlic sauce or use a spicier cheese blend for an extra kick.
- Add veggies: Sauté some diced bell peppers and onions along with the chicken for added flavor and nutrients.
- Use different cheeses: Experiment with different cheese blends, such as Monterey Jack, pepper jack, or provolone.
- Make it vegetarian: Substitute the chicken with grilled halloumi cheese or black beans for a vegetarian option.
- Meal prep friendly: These wraps are great for meal prepping! Assemble the wraps and store them in the refrigerator for up to 3 days. When you’re ready to eat, simply heat them up in a skillet or microwave.
I hope you enjoy these cheesy garlic chicken wraps as much as I do! They’re perfect for a quick and easy weeknight meal, a party appetizer, or a satisfying lunch. Let me know in the comments if you try them out and what variations you come up with!
Conclusion:
So there you have it! These Cheesy Garlic Chicken Wraps are truly a game-changer for busy weeknights, lazy weekends, or even a fun lunch. I genuinely believe this recipe is a must-try because it delivers incredible flavor with minimal effort. The combination of juicy chicken, creamy cheese, and that irresistible garlic kick is simply divine. Plus, the customizable nature of wraps makes it a winner for even the pickiest eaters.
Why is this recipe a must-try? Because it’s quick, easy, and utterly delicious! You’re getting a complete meal packed into a convenient, hand-held package. Forget complicated recipes with dozens of ingredients; this one is all about maximizing flavor with simple, readily available components. And let’s be honest, who can resist the allure of melted cheese and garlic?
But the fun doesn’t stop there! Feel free to get creative with your fillings and serving suggestions.
Serving Suggestions and Variations:
* Spice it up! Add a pinch of red pepper flakes to the chicken mixture or a drizzle of hot sauce to the finished wrap for an extra kick.
* Go Green! Incorporate some fresh spinach, arugula, or chopped kale for added nutrients and a vibrant pop of color.
* Mediterranean Twist: Swap the cheddar cheese for feta and add some chopped olives, sun-dried tomatoes, and a dollop of hummus.
* Mexican Fiesta: Use Monterey Jack cheese, add some black beans, corn, and salsa for a south-of-the-border flavor.
* Dip it! Serve these wraps with a side of ranch dressing, blue cheese dressing, or even a simple sour cream dip.
* Make it a Salad: If you’re watching your carbs, skip the wrap altogether and serve the cheesy garlic chicken mixture over a bed of lettuce with your favorite salad toppings.
* Grill it! For an extra layer of flavor and a crispy exterior, grill the assembled wraps for a few minutes on each side until golden brown and the cheese is melted and bubbly.
* Air Fryer Magic: Air frying these wraps is another great option for a crispy and quick meal. Just spray the wraps with a little oil and air fry at 375°F (190°C) for about 5-7 minutes, flipping halfway through.
I’m confident that once you try these Cheesy Garlic Chicken Wraps, they’ll become a regular part of your meal rotation. They’re perfect for a quick lunch, a satisfying dinner, or even a fun appetizer for parties. The possibilities are endless!
So, what are you waiting for? Head to the kitchen, gather your ingredients, and get ready to experience the deliciousness of these wraps. I’m so excited for you to try them!
And most importantly, I’d love to hear about your experience! Did you try any of the variations I suggested? Did you add your own special touch? Share your photos and comments below – I can’t wait to see what you create. Don’t forget to rate the recipe too! Happy cooking, and enjoy your Cheesy Garlic Chicken Wraps!
Cheesy Garlic Chicken Wraps: The Ultimate Recipe Guide
Flavorful shredded chicken, creamy garlic sauce, and melted cheese wrapped in a warm tortilla. A quick, easy, and satisfying meal!
Ingredients
- 2 large boneless, skinless chicken breasts (about 1.5 lbs total)
- 1 tablespoon olive oil
- 1 teaspoon garlic powder
- 1 teaspoon onion powder
- 1/2 teaspoon dried oregano
- 1/4 teaspoon red pepper flakes (optional, for a little heat)
- Salt and freshly ground black pepper to taste
- 1/2 cup mayonnaise
- 1/4 cup sour cream (or Greek yogurt for a tangier flavor)
- 3 cloves garlic, minced
- 1 tablespoon lemon juice
- 1 tablespoon chopped fresh parsley
- 1/4 teaspoon salt
- 1/8 teaspoon black pepper
- 4 large flour tortillas (10-12 inch diameter)
- 1 cup shredded mozzarella cheese
- 1/2 cup shredded cheddar cheese
- 1/4 cup grated Parmesan cheese
- 1/4 cup chopped fresh cilantro (optional, for garnish)
- Optional toppings: diced tomatoes, shredded lettuce, sliced avocado
Instructions
- Prep the Chicken: Pat chicken breasts dry. If thick, slice horizontally.
- Season the Chicken: Combine garlic powder, onion powder, oregano, red pepper flakes (if using), salt, and pepper. Rub all over chicken.
- Sear the Chicken: Heat olive oil in a skillet over medium-high heat. Sear chicken for 4-5 minutes per side, until browned and internal temperature reaches 165°F (74°C).
- Rest and Shred the Chicken: Remove chicken, let rest for 5-10 minutes, then shred with two forks.
- Make the Garlic Sauce: Whisk together mayonnaise, sour cream (or Greek yogurt), minced garlic, lemon juice, parsley, salt, and pepper. Adjust seasonings to taste. Chill for 30 minutes (optional).
- Warm the Tortillas (Optional): Warm tortillas in a dry skillet or microwave.
- Assemble the Wraps: Lay tortilla flat, spread with garlic sauce, sprinkle with mozzarella, cheddar, and Parmesan cheese. Top with shredded chicken and optional toppings.
- Roll the Wrap: Fold in sides, then roll tightly from the bottom up.
- Cook the Wraps (Optional): Heat a skillet over medium heat. Cook wraps seam-side down for 2-3 minutes per side, until golden brown and cheese is melted.
- Serve: Let cool slightly, slice in half, garnish with cilantro (optional), and serve immediately.
Notes
- Spice it up: Add cayenne pepper to the garlic sauce or use a spicier cheese blend.
- Add veggies: Sauté diced bell peppers and onions with the chicken.
- Use different cheeses: Experiment with Monterey Jack, pepper jack, or provolone.
- Make it vegetarian: Substitute chicken with grilled halloumi or black beans.
- Meal prep friendly: Assemble wraps and store in the refrigerator for up to 3 days. Heat in a skillet or microwave when ready to eat.
Printable Recipe Card
Want just the essential recipe details without scrolling through the article? Get our printable recipe card with just the ingredients and instructions.

