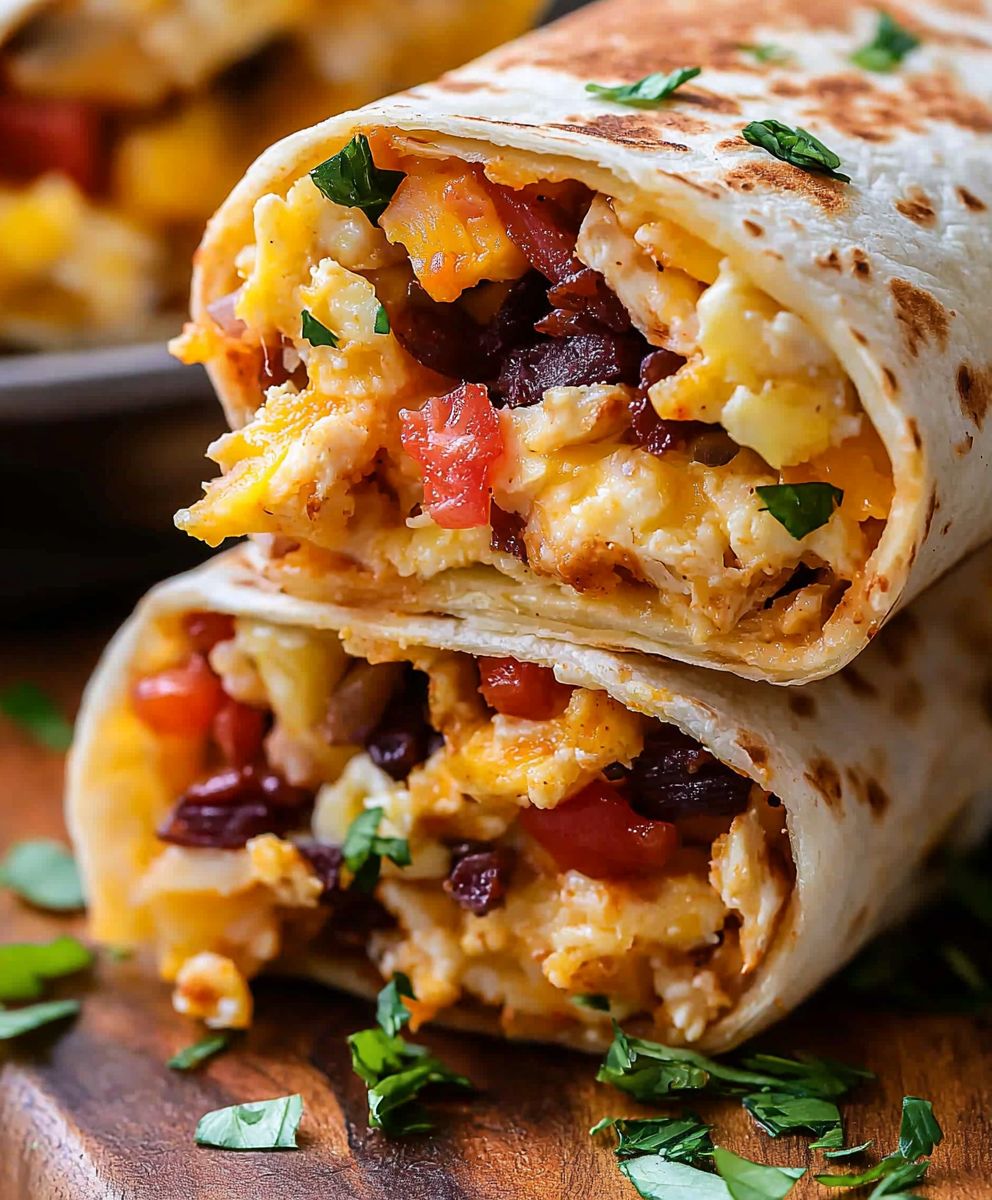
Breakfast Burrito Freezer Friendly: the ultimate make-ahead meal that will revolutionize your mornings! Imagine waking up to the aroma of a delicious, savory breakfast without lifting a finger. No more frantic searches for ingredients or rushed cooking sessions before heading out the door. These aren’t just any burritos; they’re a passport to stress-free mornings and a guaranteed delicious start to your day.
The humble burrito, with its roots in Mexican cuisine, has evolved into a global phenomenon. While its exact origins are debated, the burrito’s practicality as a portable and complete meal has made it a staple in many cultures. In the United States, the breakfast burrito gained popularity as a convenient option for busy individuals seeking a hearty and satisfying meal on the go.
What makes a breakfast burrito freezer friendly so irresistible? It’s the perfect combination of textures and flavors – fluffy scrambled eggs, savory sausage or bacon, melted cheese, and perhaps a touch of salsa or your favorite hot sauce, all wrapped in a warm, comforting tortilla. But beyond the taste, it’s the sheer convenience that wins people over. Preparing a batch of these burritos on the weekend means you have a ready-to-go breakfast for the entire week. Simply grab one from the freezer, heat it up, and enjoy a wholesome and delicious meal in minutes. Say goodbye to breakfast boredom and hello to a world of flavorful possibilities!

Ingredients:
- For the Scrambled Eggs:
- 12 large eggs
- 1/2 cup milk (whole milk recommended for richness)
- 1/4 cup heavy cream (optional, for extra creaminess)
- 1 teaspoon salt
- 1/2 teaspoon black pepper
- 2 tablespoons butter or oil
- For the Filling:
- 1 pound breakfast sausage (Italian sausage or chorizo also work well)
- 1 large onion, diced
- 1 green bell pepper, diced
- 1 red bell pepper, diced
- 1 (4 ounce) can diced green chilies, drained
- 1 teaspoon chili powder
- 1/2 teaspoon cumin
- 1/4 teaspoon garlic powder
- 1/4 teaspoon smoked paprika
- Salt and pepper to taste
- 2 cups shredded cheddar cheese (or your favorite cheese blend)
- 1 (15 ounce) can black beans, rinsed and drained
- 1 (15 ounce) can pinto beans, rinsed and drained
- Optional: Cooked and diced potatoes (about 2 cups)
- For the Burritos:
- 12 large flour tortillas (10-12 inch size)
- Optional: Salsa, sour cream, guacamole for serving
Preparing the Filling:
- Cook the Sausage: In a large skillet over medium-high heat, crumble the breakfast sausage and cook until browned, breaking it up with a spoon as it cooks. Drain off any excess grease. I like to use a paper towel to soak up any extra fat.
- Sauté the Vegetables: Add the diced onion, green bell pepper, and red bell pepper to the skillet with the cooked sausage. Cook until the vegetables are softened, about 5-7 minutes. Stir occasionally to prevent burning. The aroma at this point is just amazing!
- Add Spices and Chilies: Stir in the chili powder, cumin, garlic powder, smoked paprika, salt, and pepper. Cook for another minute, stirring constantly, until the spices are fragrant. This really wakes up the flavors. Then, add the drained diced green chilies.
- Incorporate the Beans: Add the rinsed and drained black beans and pinto beans to the skillet. Stir to combine all the ingredients. If you’re using cooked potatoes, add them now as well. Cook for another 2-3 minutes, allowing the beans to heat through.
- Taste and Adjust: Taste the filling and adjust the seasonings as needed. You might want to add more salt, pepper, chili powder, or cumin depending on your preference. Remember, you can always add more, but you can’t take it away!
Preparing the Scrambled Eggs:
- Whisk the Eggs: In a large bowl, whisk together the eggs, milk, heavy cream (if using), salt, and pepper until well combined. Make sure there are no streaks of egg yolk remaining.
- Cook the Eggs: Melt the butter or heat the oil in a large non-stick skillet over medium heat. Once the butter is melted and the skillet is hot, pour in the egg mixture.
- Scramble the Eggs: Cook the eggs, stirring frequently with a spatula, until they are set but still slightly moist. Be careful not to overcook them, as they will continue to cook as they cool. I prefer my scrambled eggs to be soft and creamy, so I take them off the heat just before they look completely done.
- Cool the Eggs: Remove the skillet from the heat and let the scrambled eggs cool slightly before assembling the burritos. This will prevent the tortillas from getting soggy.
Assembling the Burritos:
- Warm the Tortillas (Optional): To make the tortillas more pliable and easier to roll, you can warm them slightly. You can do this by wrapping them in a damp paper towel and microwaving them for 30-60 seconds, or by heating them in a dry skillet over medium heat for a few seconds per side.
- Assemble the Burritos: Lay a tortilla flat on a clean surface. Spoon about 1/2 cup of the scrambled eggs onto the center of the tortilla.
- Add the Filling: Top the eggs with about 1/2 cup of the sausage and vegetable filling.
- Add Cheese: Sprinkle about 1/4 cup of shredded cheddar cheese over the filling.
- Fold the Burrito: Fold in the sides of the tortilla towards the center, then fold the bottom edge up and over the filling, tucking it in tightly. Roll the burrito forward to enclose the filling completely.
- Repeat: Repeat steps 2-5 with the remaining tortillas, eggs, filling, and cheese.
Freezing the Burritos:
- Wrap Individually: Wrap each burrito tightly in plastic wrap. Make sure to remove as much air as possible to prevent freezer burn.
- Wrap Again (Optional): For extra protection against freezer burn, you can wrap each burrito again in aluminum foil. This is especially helpful if you plan to freeze them for an extended period.
- Label and Date: Label each burrito with the date and contents. This will help you keep track of them in the freezer.
- Freeze: Place the wrapped burritos in a freezer-safe bag or container and freeze for up to 2-3 months.
Reheating the Burritos:
- Thaw (Recommended): For best results, thaw the frozen burrito in the refrigerator overnight. This will help prevent the tortilla from becoming soggy.
- Microwave: Remove the plastic wrap and foil (if using) from the burrito. Wrap the burrito in a damp paper towel and microwave on high for 1-2 minutes, or until heated through. Check the internal temperature to ensure it reaches 165°F.
- Oven (Optional): Preheat the oven to 350°F (175°C). Remove the plastic wrap and foil (if using) from the burrito. Wrap the burrito in aluminum foil and bake for 20-25 minutes, or until heated through. This method will result in a slightly crispier tortilla.
- Skillet (Optional): Heat a skillet over medium heat. Remove the plastic wrap and foil (if using) from the burrito. Place the burrito in the skillet and cook for 2-3 minutes per side, or until heated through and the tortilla is golden brown and crispy. This is my favorite way to reheat them!
- Serve: Serve the reheated burrito with your favorite toppings, such as salsa, sour cream, or guacamole. Enjoy!
Conclusion:
And there you have it! This Breakfast Burrito Freezer Friendly recipe is more than just a meal; it’s a game-changer for busy mornings, a lifesaver for meal prepping, and a delicious way to start your day. I truly believe this will become a staple in your household, just as it has in mine. The combination of savory fillings, the ease of preparation, and the sheer convenience of having a ready-to-go breakfast at your fingertips makes this recipe a must-try.
Think about it: no more skipping breakfast because you’re short on time. No more grabbing unhealthy options on the go. With these freezer-friendly breakfast burritos, you’ll always have a nutritious and satisfying meal waiting for you. Plus, the customizable nature of the recipe means you can tailor it to your exact preferences.
But the real magic lies in the flavor. The perfectly seasoned eggs, the hearty protein, the melty cheese – it all comes together in a symphony of deliciousness that will leave you feeling energized and ready to tackle whatever the day throws your way. And the best part? You can enjoy this incredible flavor without spending hours in the kitchen each morning.
Serving Suggestions and Variations:
The possibilities are truly endless when it comes to serving and customizing these burritos. For a spicier kick, add a dash of your favorite hot sauce or a sprinkle of red pepper flakes to the egg mixture. If you’re a fan of avocado, slice some up and add it to your burrito right before serving for a creamy and healthy boost.
Looking for vegetarian options? Simply swap out the meat for black beans, pinto beans, or even some sautéed vegetables like bell peppers, onions, and mushrooms. You can also add a dollop of sour cream or Greek yogurt for extra tang and creaminess.
Consider serving your warmed burrito with a side of salsa, guacamole, or even a simple fruit salad for a complete and balanced breakfast. For a more substantial meal, you can pair it with a side of roasted potatoes or a small green salad.
Don’t be afraid to experiment with different cheeses, meats, and vegetables to create your own signature breakfast burrito. Try using chorizo instead of sausage, or adding some roasted sweet potatoes for a touch of sweetness. The key is to have fun and find the combinations that you love the most.
Ready to Get Cooking?
I’m so excited for you to try this recipe and experience the convenience and deliciousness of these Breakfast Burrito Freezer Friendly wonders. I know you’ll love having a stash of these ready to go in your freezer, ready to fuel your busy days.
So, gather your ingredients, put on some music, and get ready to embark on a meal-prepping adventure. I promise you won’t regret it.
And most importantly, I want to hear about your experience! Did you make any modifications to the recipe? What were your favorite fillings? What did your family think? Share your thoughts, photos, and tips in the comments below. I can’t wait to see what you create! Happy cooking!
Breakfast Burrito Freezer Friendly: Make Ahead & Enjoy All Week!
Hearty breakfast burritos with scrambled eggs, sausage, peppers, onions, beans, cheese, and spices. Great for meal prep and freezing!
Ingredients
- 12 large eggs
- 1/2 cup milk (whole milk recommended for richness)
- 1/4 cup heavy cream (optional, for extra creaminess)
- 1 teaspoon salt
- 1/2 teaspoon black pepper
- 2 tablespoons butter or oil
- 1 pound breakfast sausage (Italian sausage or chorizo also work well)
- 1 large onion, diced
- 1 green bell pepper, diced
- 1 red bell pepper, diced
- 1 (4 ounce) can diced green chilies, drained
- 1 teaspoon chili powder
- 1/2 teaspoon cumin
- 1/4 teaspoon garlic powder
- 1/4 teaspoon smoked paprika
- Salt and pepper to taste
- 2 cups shredded cheddar cheese (or your favorite cheese blend)
- 1 (15 ounce) can black beans, rinsed and drained
- 1 (15 ounce) can pinto beans, rinsed and drained
- Optional: Cooked and diced potatoes (about 2 cups)
- 12 large flour tortillas (10-12 inch size)
- Optional: Salsa, sour cream, guacamole for serving
Instructions
- Cook the Sausage: In a large skillet over medium-high heat, crumble the breakfast sausage and cook until browned, breaking it up with a spoon as it cooks. Drain off any excess grease.
- Sauté the Vegetables: Add the diced onion, green bell pepper, and red bell pepper to the skillet with the cooked sausage. Cook until the vegetables are softened, about 5-7 minutes. Stir occasionally to prevent burning.
- Add Spices and Chilies: Stir in the chili powder, cumin, garlic powder, smoked paprika, salt, and pepper. Cook for another minute, stirring constantly, until the spices are fragrant. Then, add the drained diced green chilies.
- Incorporate the Beans: Add the rinsed and drained black beans and pinto beans to the skillet. Stir to combine all the ingredients. If you’re using cooked potatoes, add them now as well. Cook for another 2-3 minutes, allowing the beans to heat through.
- Taste and Adjust: Taste the filling and adjust the seasonings as needed. You might want to add more salt, pepper, chili powder, or cumin depending on your preference.
- Whisk the Eggs: In a large bowl, whisk together the eggs, milk, heavy cream (if using), salt, and pepper until well combined.
- Cook the Eggs: Melt the butter or heat the oil in a large non-stick skillet over medium heat. Once the butter is melted and the skillet is hot, pour in the egg mixture.
- Scramble the Eggs: Cook the eggs, stirring frequently with a spatula, until they are set but still slightly moist. Be careful not to overcook them, as they will continue to cook as they cool.
- Cool the Eggs: Remove the skillet from the heat and let the scrambled eggs cool slightly before assembling the burritos. This will prevent the tortillas from getting soggy.
- Warm the Tortillas (Optional): To make the tortillas more pliable and easier to roll, you can warm them slightly. You can do this by wrapping them in a damp paper towel and microwaving them for 30-60 seconds, or by heating them in a dry skillet over medium heat for a few seconds per side.
- Assemble the Burritos: Lay a tortilla flat on a clean surface. Spoon about 1/2 cup of the scrambled eggs onto the center of the tortilla.
- Add the Filling: Top the eggs with about 1/2 cup of the sausage and vegetable filling.
- Add Cheese: Sprinkle about 1/4 cup of shredded cheddar cheese over the filling.
- Fold the Burrito: Fold in the sides of the tortilla towards the center, then fold the bottom edge up and over the filling, tucking it in tightly. Roll the burrito forward to enclose the filling completely.
- Repeat: Repeat steps 11-14 with the remaining tortillas, eggs, filling, and cheese.
- Wrap Individually (Freezing): Wrap each burrito tightly in plastic wrap. Make sure to remove as much air as possible to prevent freezer burn.
- Wrap Again (Optional – Freezing): For extra protection against freezer burn, you can wrap each burrito again in aluminum foil.
- Label and Date (Freezing): Label each burrito with the date and contents.
- Freeze: Place the wrapped burritos in a freezer-safe bag or container and freeze for up to 2-3 months.
- Thaw (Recommended – Reheating): For best results, thaw the frozen burrito in the refrigerator overnight.
- Microwave (Reheating): Remove the plastic wrap and foil (if using) from the burrito. Wrap the burrito in a damp paper towel and microwave on high for 1-2 minutes, or until heated through. Check the internal temperature to ensure it reaches 165°F.
- Oven (Optional – Reheating): Preheat the oven to 350°F (175°C). Remove the plastic wrap and foil (if using) from the burrito. Wrap the burrito in aluminum foil and bake for 20-25 minutes, or until heated through.
- Skillet (Optional – Reheating): Heat a skillet over medium heat. Remove the plastic wrap and foil (if using) from the burrito. Place the burrito in the skillet and cook for 2-3 minutes per side, or until heated through and the tortilla is golden brown and crispy.
- Serve: Serve the reheated burrito with your favorite toppings, such as salsa, sour cream, or guacamole. Enjoy!
Notes
- For extra creamy scrambled eggs, use whole milk and heavy cream.
- Feel free to substitute the breakfast sausage with Italian sausage or chorizo.
- Adjust the amount of chili powder, cumin, salt, and pepper to your liking.
- Warming the tortillas before assembling the burritos makes them more pliable and easier to roll.
- For best results when freezing, wrap the burritos tightly in plastic wrap and then aluminum foil to prevent freezer burn.
- Thawing the burritos in the refrigerator overnight before reheating will help prevent the tortillas from becoming soggy.
- Reheat the burritos in the microwave, oven, or skillet, depending on your preference.