
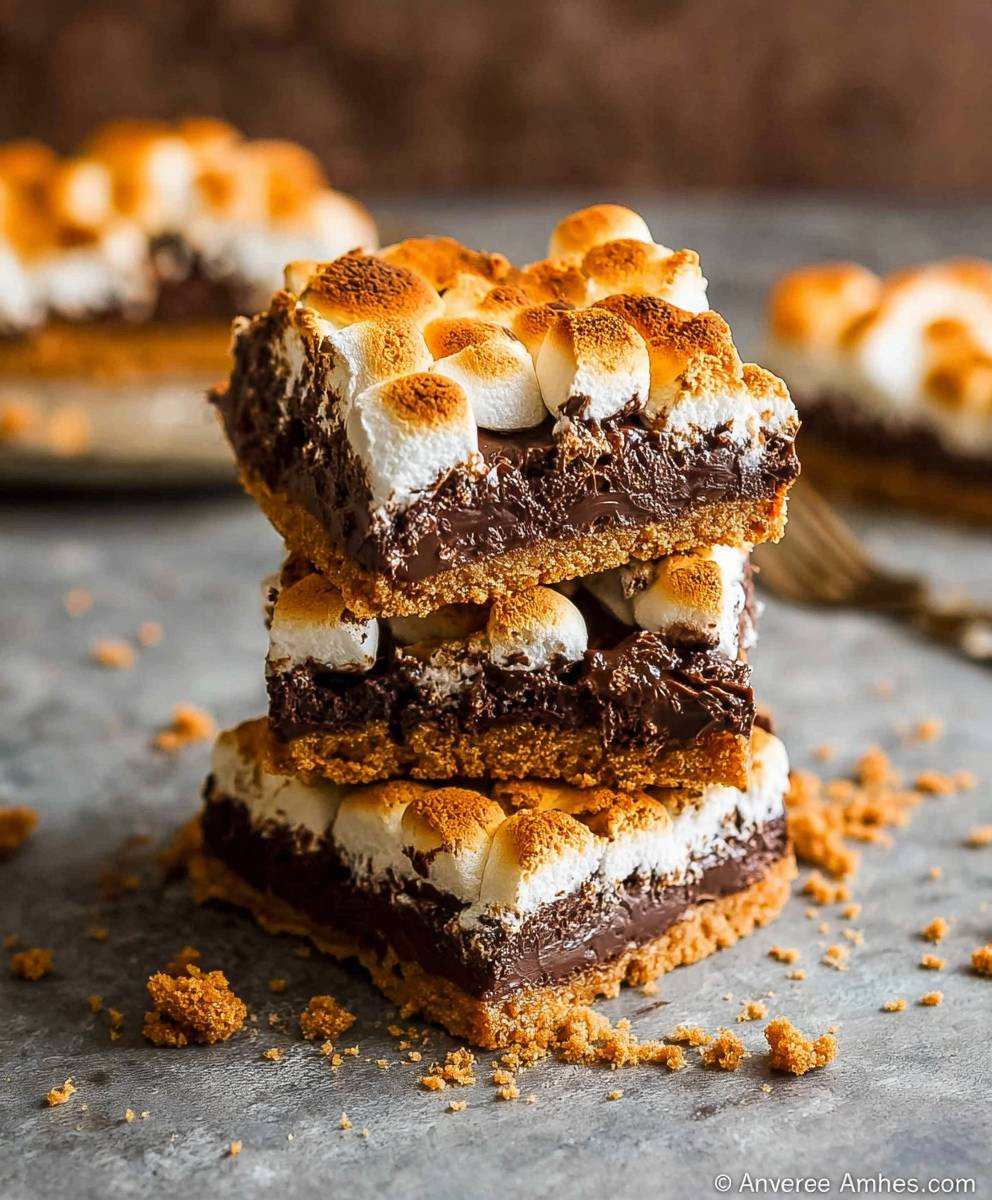
Easy S’more Bars: the name says it all! Imagine sinking your teeth into a gooey, chocolatey, marshmallowy dream, all without the hassle of a campfire. These aren’t just any dessert bars; they’re a shortcut to pure, unadulterated happiness, reminiscent of those cherished summer nights spent roasting marshmallows under the stars.
The humble s’more, a quintessential American treat, has a history as rich and layered as its flavors. While its exact origins are debated, the first published recipe for “Some More” appeared in a Girl Scout handbook in the 1920s. Since then, it has become a beloved tradition, symbolizing warmth, friendship, and the simple joys of life. But let’s be honest, sometimes you crave that s’more goodness without the smoke and sticky fingers. That’s where these easy S’more Bars come in!
People adore s’mores for their irresistible combination of textures and tastes: the crisp graham cracker, the melty chocolate, and the soft, pillowy marshmallow. These bars capture all of that magic in a convenient, portable, and utterly addictive form. They’re perfect for potlucks, bake sales, or simply satisfying your sweet tooth on a cozy evening. So, ditch the campfire and get ready to experience the ultimate s’more indulgence with this incredibly easy recipe!

Ingredients:
- Graham Crackers: 1 ½ cups graham cracker crumbs (about 12 full sheets)
- Unsalted Butter: ½ cup (1 stick), melted
- Granulated Sugar: ¼ cup
- Salt: ¼ teaspoon
- Semi-Sweet Chocolate Chips: 1 ½ cups
- Milk Chocolate Chips: ½ cup (optional, for extra chocolatey flavor)
- Mini Marshmallows: 4 cups
- Flaky Sea Salt: For sprinkling on top (optional, but highly recommended!)
Preparing the Graham Cracker Crust:
Okay, let’s get started with the foundation of our S’more Bars – the graham cracker crust! This is super easy and comes together in minutes. I promise, you’ll be snacking on these bars before you know it!
- Crush the Graham Crackers: The first step is to turn those graham crackers into crumbs. You have a couple of options here. You can use a food processor, which is the quickest and easiest method. Just toss the graham crackers in and pulse until you have fine crumbs. Alternatively, you can place the graham crackers in a large zip-top bag and crush them with a rolling pin. This is a great stress reliever, by the way! Just make sure you crush them finely enough so the crust holds together well. You should end up with about 1 ½ cups of crumbs.
- Melt the Butter: Next, melt ½ cup (1 stick) of unsalted butter. You can do this in the microwave in 30-second intervals, stirring in between, or in a small saucepan over low heat. Be careful not to burn the butter!
- Combine the Ingredients: In a medium bowl, combine the graham cracker crumbs, melted butter, granulated sugar, and salt. Mix everything together until the crumbs are evenly moistened. The mixture should resemble wet sand.
- Press into the Pan: Now, grab an 8×8 inch baking pan. I like to line mine with parchment paper, leaving an overhang on the sides. This makes it super easy to lift the bars out later and cut them neatly. Press the graham cracker mixture firmly and evenly into the bottom of the prepared pan. You can use the bottom of a measuring cup or your fingers to really pack it down. A well-packed crust is key to preventing it from crumbling later.
- Bake the Crust: Place the pan in a preheated oven at 350°F (175°C) and bake for 8-10 minutes. This will help the crust set and become nice and golden brown. Keep a close eye on it to prevent it from burning. Once baked, remove the crust from the oven and let it cool slightly while you prepare the chocolate and marshmallow layers.
Layering the Chocolate and Marshmallows:
This is where the magic happens! We’re going to create that gooey, chocolatey, marshmallowy goodness that makes S’mores so irresistible. Get ready for some serious deliciousness!
- Sprinkle the Chocolate Chips: While the graham cracker crust is still warm, sprinkle the semi-sweet chocolate chips evenly over the top. If you’re using milk chocolate chips as well, sprinkle those on top of the semi-sweet chocolate chips. The warmth of the crust will help the chocolate chips start to melt, creating a nice, even layer.
- Add the Marshmallows: Now, it’s time for the marshmallows! Pour the mini marshmallows evenly over the chocolate chips. Make sure to cover the entire surface of the crust. Don’t be shy – the more marshmallows, the better!
Broiling the Marshmallows:
This is the trickiest part, but also the most rewarding! We want to toast the marshmallows to golden brown perfection without burning them. Keep a close watch and don’t walk away!
- Broil the Marshmallows: Place the pan under the broiler for 1-2 minutes, or until the marshmallows are golden brown and toasted to your liking. Watch them very carefully! Marshmallows can go from perfectly toasted to burnt in a matter of seconds. I recommend staying right in front of the oven and keeping the door slightly ajar.
- Remove from Broiler: Once the marshmallows are toasted to your liking, immediately remove the pan from the broiler.
Cooling and Cutting:
Patience is a virtue, especially when it comes to S’more Bars! Letting them cool properly will make them much easier to cut and prevent them from being a gooey mess. Trust me, it’s worth the wait!
- Cool Completely: Let the S’more Bars cool completely in the pan before cutting. This will take at least 30 minutes, but I recommend letting them cool for an hour or even longer. You can even pop them in the refrigerator to speed up the cooling process.
- Cut into Squares: Once the bars are completely cool, use a sharp knife to cut them into squares. If you lined the pan with parchment paper, you can simply lift the bars out of the pan using the overhang and cut them on a cutting board. This will make cutting much easier and cleaner.
- Sprinkle with Sea Salt (Optional): For an extra touch of flavor, sprinkle the S’more Bars with flaky sea salt before serving. The salt will enhance the sweetness of the chocolate and marshmallows and create a delicious contrast.
Tips and Variations:
Want to customize your S’more Bars? Here are a few ideas to get you started:
- Different Chocolate: Experiment with different types of chocolate chips. Try dark chocolate, peanut butter chips, or even white chocolate chips.
- Add Nuts: Sprinkle chopped nuts, such as pecans, walnuts, or almonds, over the chocolate chips before adding the marshmallows.
- Use Different Crackers: Try using chocolate graham crackers or even Ritz crackers for a salty-sweet twist.
- Caramel Swirl: Drizzle caramel sauce over the marshmallows before broiling for a decadent caramel S’more Bar.
- Peanut Butter: Spread a thin layer of peanut butter over the graham cracker crust before adding the chocolate chips.
- Marshmallow Fluff: For an extra gooey treat, spread a layer of marshmallow fluff over the chocolate chips before adding the mini marshmallows.
- S’mores Dip Variation: Instead of cutting into bars, serve the warm, gooey mixture as a dip with graham crackers for scooping.
Storage Instructions:
Store leftover S’more Bars in an airtight container at room temperature for up to 3 days. They are best enjoyed fresh, but they will still be delicious the next day!
Troubleshooting:
- Marshmallows Burning: If your marshmallows are burning too quickly, lower the rack in your oven or reduce the broiling time.
- Crust Crumbling: If your crust is crumbling, make sure you are pressing it firmly enough into the pan. You can also add a little more melted butter to the mixture.
- Bars Too Gooey: If your bars are too gooey, let them cool completely before cutting. You can also refrigerate them for a few hours to help them set up.
Enjoy!
I hope you enjoy these Easy S’more Bars as much as I do! They’re the perfect treat for any occasion and are sure to be a crowd-pleaser. Happy baking!
Conclusion:
So there you have it! These Easy S’more Bars are truly a must-try recipe, and I’m not just saying that because I created it! The combination of the buttery graham cracker crust, the gooey chocolate center, and the perfectly toasted marshmallow topping is simply irresistible. It’s like a campfire treat, but without the campfire (or the sticky fingers, quite as much!). Seriously, if you’re looking for a crowd-pleasing dessert that’s easy to make and guaranteed to disappear quickly, look no further.
But what makes these bars so special, beyond the obvious deliciousness? It’s the simplicity! You don’t need any fancy equipment or complicated techniques. It’s a perfect recipe for beginner bakers and seasoned pros alike. Plus, it’s incredibly versatile. Need a dessert for a potluck? These bars travel well. Want a sweet treat for a weeknight? They come together in under an hour. Craving something nostalgic? These bars will transport you right back to your childhood summers.
And speaking of versatility, let’s talk about serving suggestions and variations! While these Easy S’more Bars are amazing on their own, warm or cold, there are so many ways to customize them to your liking. For a truly decadent experience, try serving them warm with a scoop of vanilla ice cream. The contrast of the warm, gooey bar and the cold, creamy ice cream is heavenly. Or, drizzle them with a little melted chocolate or caramel sauce for an extra touch of sweetness.
If you’re feeling adventurous, you can experiment with different types of chocolate. Milk chocolate is classic, but dark chocolate adds a richer, more sophisticated flavor. You could even use white chocolate for a unique twist. And don’t forget about the marshmallows! Mini marshmallows are perfect for even coverage, but you can also use large marshmallows, cut into smaller pieces, for a more rustic look.
For a fun variation, try adding a layer of peanut butter between the graham cracker crust and the chocolate. The peanut butter adds a salty-sweet element that complements the other flavors perfectly. Or, sprinkle some chopped nuts, like pecans or walnuts, on top of the marshmallow topping before baking for added crunch and flavor. Another great idea is to add a pinch of sea salt to the top of the bars after they come out of the oven. The salt enhances the sweetness and adds a delightful savory note.
These Easy S’more Bars are also a fantastic base for other creative desserts. You could crumble them over ice cream sundaes, use them as a topping for brownies, or even incorporate them into a milkshake. The possibilities are endless!
I truly believe that everyone should have this recipe in their repertoire. It’s a guaranteed crowd-pleaser, it’s easy to make, and it’s incredibly versatile. So, what are you waiting for? Get in the kitchen and whip up a batch of these amazing Easy S’more Bars!
I’m so excited for you to try this recipe, and I can’t wait to hear what you think! Please, please, please let me know how they turn out. Did you make any variations? What did your friends and family think? Share your photos and stories with me in the comments below! I love seeing your creations and hearing about your experiences. Happy baking!
Easy S'more Bars: The Simplest Recipe You'll Ever Need
Easy S'more Bars! Classic s'mores flavors in a convenient bar form, no campfire needed. Graham cracker crust topped with chocolate and toasted marshmallows.
Ingredients
- 1 ½ cups graham cracker crumbs (about 12 full sheets)
- ½ cup (1 stick) unsalted butter, melted
- ¼ cup granulated sugar
- ¼ teaspoon salt
- 1 ½ cups semi-sweet chocolate chips
- ½ cup milk chocolate chips (optional, for extra chocolatey flavor)
- 4 cups mini marshmallows
- Flaky sea salt (for sprinkling on top, optional)
Instructions
- Crush the graham crackers into fine crumbs using a food processor or a rolling pin in a zip-top bag (about 1 ½ cups).
- Melt the butter in the microwave or in a saucepan over low heat.
- In a medium bowl, combine the graham cracker crumbs, melted butter, granulated sugar, and salt. Mix until evenly moistened.
- Press the mixture firmly and evenly into the bottom of an 8×8 inch baking pan (lined with parchment paper for easy removal).
- Bake in a preheated oven at 350°F (175°C) for 8-10 minutes, until golden brown. Let cool slightly.
- While the crust is still warm, sprinkle the semi-sweet chocolate chips evenly over the top. Add milk chocolate chips if using.
- Pour the mini marshmallows evenly over the chocolate chips, covering the entire surface.
- Place the pan under the broiler for 1-2 minutes, or until the marshmallows are golden brown and toasted to your liking. Watch very carefully to prevent burning.
- Immediately remove the pan from the broiler.
- Let the S’more Bars cool completely in the pan before cutting (at least 30 minutes, preferably longer). Refrigerate to speed up cooling.
- Use a sharp knife to cut into squares. Lift out of the pan using the parchment paper overhang if used.
- Sprinkle with flaky sea salt (optional).
Notes
- Experiment with different types of chocolate chips. Try dark chocolate, peanut butter chips, or even white chocolate chips.
- Sprinkle chopped nuts, such as pecans, walnuts, or almonds, over the chocolate chips before adding the marshmallows.
- Try using chocolate graham crackers or even Ritz crackers for a salty-sweet twist.
- Drizzle caramel sauce over the marshmallows before broiling for a decadent caramel S’more Bar.
- Spread a thin layer of peanut butter over the graham cracker crust before adding the chocolate chips.
- For an extra gooey treat, spread a layer of marshmallow fluff over the chocolate chips before adding the mini marshmallows.
- Instead of cutting into bars, serve the warm, gooey mixture as a dip with graham crackers for scooping.
- Store leftover S’more Bars in an airtight container at room temperature for up to 3 days.
- If your marshmallows are burning too quickly, lower the rack in your oven or reduce the broiling time.
- If your crust is crumbling, make sure you are pressing it firmly enough into the pan. You can also add a little more melted butter to the mixture.
- If your bars are too gooey, let them cool completely before cutting. You can also refrigerate them for a few hours to help them set up.
Printable Recipe Card
Want just the essential recipe details without scrolling through the article? Get our printable recipe card with just the ingredients and instructions.