
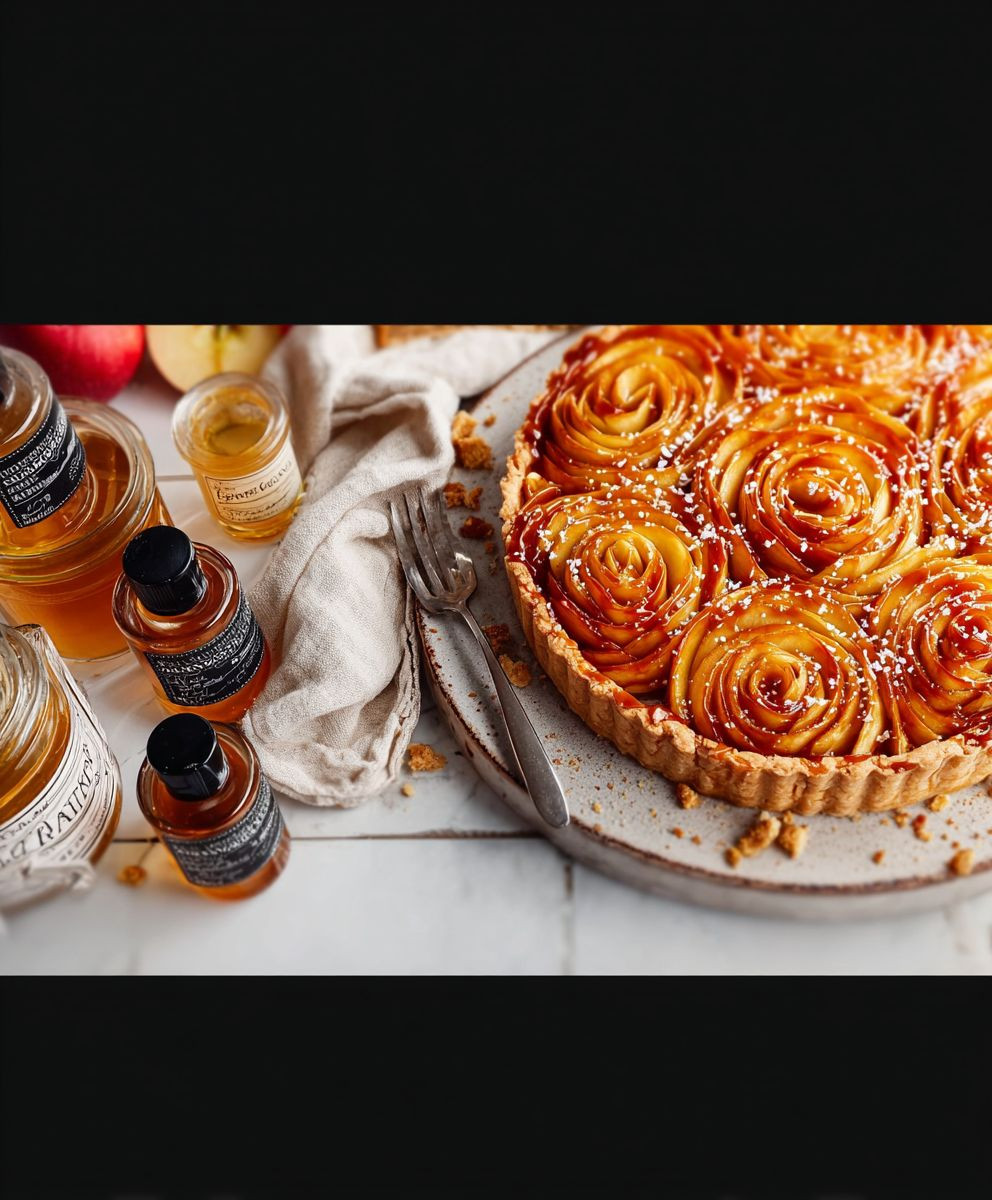
Salted Caramel Apple Tart: Prepare to be utterly captivated! Imagine sinking your teeth into a buttery, flaky crust, giving way to a symphony of sweet and tart apples, all enrobed in a luscious, homemade salted caramel. This isn’t just dessert; it’s an experience, a journey for your taste buds that will leave you craving more.
Apple tarts, in their various forms, have graced tables for centuries, a testament to the enduring appeal of simple, wholesome ingredients transformed into something extraordinary. While the exact origins of combining apples and pastry are difficult to pinpoint, variations have appeared across numerous cultures, each adding their unique touch. The addition of salted caramel, however, is a more modern twist, a delightful play on sweet and savory that elevates this classic to new heights.
What makes this Salted Caramel Apple Tart so irresistible? It’s the perfect balance of textures – the crispness of the apples, the smoothness of the caramel, and the satisfying crunch of the crust. The sweetness of the apples is beautifully offset by the salty notes in the caramel, creating a complex and addictive flavor profile. Plus, while it looks impressive, this tart is surprisingly easy to make, making it the perfect dessert for both special occasions and cozy weeknight dinners. I promise, once you try this recipe, it will become a staple in your baking repertoire!

Ingredients:
- For the Crust:
- 1 1/4 cups all-purpose flour
- 1/2 teaspoon salt
- 1/2 cup (1 stick) cold unsalted butter, cut into cubes
- 1/4 cup ice water
- For the Caramel:
- 1 cup granulated sugar
- 1/4 cup water
- 1/2 cup heavy cream, warmed
- 4 tablespoons (1/2 stick) unsalted butter, cut into cubes
- 1/2 teaspoon sea salt, or to taste
- For the Apple Filling:
- 6 medium apples (such as Honeycrisp, Gala, or Fuji), peeled, cored, and sliced
- 2 tablespoons lemon juice
- 1/4 cup granulated sugar
- 2 tablespoons all-purpose flour
- 1 teaspoon ground cinnamon
- 1/4 teaspoon ground nutmeg
- 2 tablespoons unsalted butter, melted
- For the Topping (Optional):
- Coarse sea salt, for sprinkling
- Chopped pecans or walnuts, for sprinkling
Preparing the Crust
Okay, let’s start with the crust. This is the foundation of our delicious tart, and a good crust makes all the difference. Don’t be intimidated; it’s easier than you think!
- Combine Dry Ingredients: In a large bowl, whisk together the flour and salt. This ensures the salt is evenly distributed, which is important for flavor.
- Cut in the Butter: Add the cold, cubed butter to the flour mixture. Using a pastry blender or your fingertips (work quickly to keep the butter cold!), cut the butter into the flour until the mixture resembles coarse crumbs. You should still see some small pieces of butter – that’s what creates those flaky layers!
- Add Ice Water: Gradually add the ice water, one tablespoon at a time, mixing gently after each addition. Stop adding water when the dough just comes together. Be careful not to overmix, as this will develop the gluten and make the crust tough.
- Form the Dough: Gently gather the dough into a ball. Flatten it into a disc, wrap it tightly in plastic wrap, and refrigerate for at least 30 minutes. This chilling time is crucial – it allows the gluten to relax and the butter to firm up, resulting in a tender, flaky crust. You can even chill it for a few hours or overnight if you prefer.
- Roll Out the Dough: On a lightly floured surface, roll out the dough into a 12-inch circle. If the dough is sticking, add a little more flour underneath. Be patient and work from the center outwards, rotating the dough as you go to ensure an even thickness.
- Transfer to Tart Pan: Carefully transfer the rolled-out dough to a 9-inch tart pan with a removable bottom. Gently press the dough into the bottom and up the sides of the pan.
- Trim and Crimp the Edges: Trim any excess dough from the edges of the pan. You can use a rolling pin to roll across the top of the pan, or simply trim with a knife. Crimp the edges of the crust using a fork or your fingers to create a decorative border.
- Pre-bake the Crust (Blind Bake): This step is important to prevent a soggy bottom! Preheat your oven to 375°F (190°C). Line the crust with parchment paper and fill it with pie weights or dried beans. This will prevent the crust from puffing up during baking. Bake for 15 minutes.
- Remove Weights and Bake Further: Remove the parchment paper and pie weights. Return the crust to the oven and bake for another 10-15 minutes, or until lightly golden brown. Watch it carefully to prevent burning.
- Cool the Crust: Let the crust cool completely in the tart pan before adding the filling.
Making the Salted Caramel
Now for the star of the show – the salted caramel! Don’t be scared of making caramel; it’s all about patience and watching the color. A candy thermometer is helpful, but not essential.
- Combine Sugar and Water: In a medium saucepan, combine the sugar and water. Stir to moisten the sugar.
- Cook the Caramel: Place the saucepan over medium heat. Bring the mixture to a boil and cook, without stirring, until the sugar turns a deep amber color. This will take about 8-10 minutes. Do not stir! You can swirl the pan gently if needed to ensure even cooking. Watch the color carefully – you want a deep amber, but not burnt.
- Add Heavy Cream: Once the caramel is the desired color, carefully remove the saucepan from the heat. Slowly pour in the warmed heavy cream. Be careful, as the mixture will bubble vigorously.
- Add Butter and Salt: Add the cubed butter and sea salt to the caramel. Stir until the butter is melted and the caramel is smooth and glossy.
- Cool Slightly: Let the caramel cool slightly before pouring it over the apples. This will help it thicken a bit.
Preparing the Apple Filling
The apple filling is what brings the tart together with the caramel. The spices and lemon juice enhance the natural sweetness of the apples.
- Prepare the Apples: Peel, core, and slice the apples. I like to slice them about 1/4 inch thick.
- Toss with Lemon Juice: In a large bowl, toss the apple slices with the lemon juice. This will prevent them from browning.
- Combine Dry Ingredients: In a separate small bowl, whisk together the sugar, flour, cinnamon, and nutmeg.
- Coat the Apples: Sprinkle the sugar mixture over the apples and toss to coat evenly. The flour will help to thicken the filling as it bakes.
- Melted Butter: Drizzle the melted butter over the apples and toss again.
Assembling and Baking the Tart
Now for the fun part – putting it all together! This is where your creativity can shine.
- Arrange Apples in Crust: Arrange the apple slices in the pre-baked tart crust. You can arrange them in concentric circles, or simply pile them in. Make sure they are packed tightly, as they will shrink slightly during baking.
- Pour Caramel Over Apples: Pour the slightly cooled salted caramel over the apples, making sure to distribute it evenly. Don’t worry if some of the caramel drips down the sides of the crust – it will just add to the rustic charm.
- Bake the Tart: Preheat your oven to 350°F (175°C). Bake the tart for 45-55 minutes, or until the apples are tender and the caramel is bubbly and golden brown. If the crust starts to brown too quickly, you can tent it with foil.
- Cool the Tart: Let the tart cool completely on a wire rack before serving. This will allow the caramel to set up and the flavors to meld together. It’s tempting to dig in right away, but trust me, it’s worth the wait!
- Optional Toppings: Before serving, sprinkle the tart with coarse sea salt and chopped pecans or walnuts, if desired. These toppings add a nice textural contrast and enhance the flavors.
Serving and Storing
This tart is best served at room temperature or slightly warm. You can serve it plain, or with a scoop of vanilla ice cream or a dollop of whipped cream. Leftovers can be stored in the refrigerator for up to 3 days. To reheat, simply warm it in the oven at 300°F (150°C) for a few minutes.
Tips for Success
- Use Cold Butter: Cold butter is key to a flaky crust. Make sure your butter is very cold before you start.
- Don’t Overmix the Dough: Overmixing the dough will develop the gluten and make the crust tough. Mix just until the dough comes together.
- Chill the Dough: Chilling the dough allows the gluten to relax and the butter to firm up, resulting in a tender, flaky crust.
- Watch the Caramel Carefully: Caramel can burn easily, so watch the color carefully. You want a deep amber, but not burnt.
- Use a Variety of Apples: Using a mix of apple varieties will add complexity to the flavor of the filling.
Conclusion:
This Salted Caramel Apple Tart isn’t just a dessert; it’s an experience. The symphony of sweet, salty, and tart flavors, combined with the satisfying crunch of the crust and the tender apples, makes it a truly unforgettable treat. I know, I know, I might be biased, but trust me on this one! You absolutely *need* to try this recipe.
Why is it a must-try? Because it’s surprisingly simple to make, considering the gourmet results. You don’t need to be a pastry chef to pull this off. The recipe is designed to be approachable, even for beginner bakers. Plus, the combination of textures and tastes is simply divine. The buttery, flaky crust provides the perfect foundation for the sweet and slightly tangy apples, all drizzled with that luscious, homemade salted caramel. It’s a flavor explosion in every bite!
But the best part? It’s incredibly versatile! While I personally adore it served warm with a scoop of vanilla ice cream (the contrast of hot and cold is just *chef’s kiss*), there are so many other ways to enjoy this tart. For a more decadent experience, try serving it with a dollop of whipped cream and a sprinkle of sea salt. Or, if you’re feeling adventurous, add a drizzle of chocolate sauce for an extra layer of richness.
Looking for variations? Absolutely! Feel free to experiment with different types of apples. Granny Smith apples will give you a more tart flavor, while Honeycrisp apples will add extra sweetness and crunch. You could even use a combination of different apples for a more complex flavor profile. If you’re not a fan of salted caramel (though I can’t imagine why!), you can easily omit the salt or use a regular caramel sauce.
Another fun variation is to add a sprinkle of chopped nuts to the crust before baking. Pecans, walnuts, or almonds would all work beautifully. Or, for a festive touch, add a pinch of cinnamon or nutmeg to the apple filling. The possibilities are endless!
I’ve poured my heart and soul into perfecting this recipe, and I’m confident that you’ll love it as much as I do. It’s the perfect dessert for any occasion, whether you’re hosting a dinner party, celebrating a special occasion, or simply craving a sweet treat. It’s also a wonderful way to use up all those delicious fall apples.
So, what are you waiting for? Gather your ingredients, preheat your oven, and get ready to bake the most amazing Salted Caramel Apple Tart you’ve ever tasted. I promise, you won’t regret it!
And most importantly, I want to hear about your experience! Did you try the recipe? Did you make any variations? What did you think? Share your photos and comments in the section below. I can’t wait to see your creations and hear your feedback. Happy baking! Let me know if you have any questions, I’m always happy to help. I hope this becomes a staple in your baking repertoire, just like it is in mine. Enjoy!
Salted Caramel Apple Tart: The Ultimate Fall Dessert Recipe
A decadent salted caramel apple tart with a flaky homemade crust, sweet and tart apples, and a rich, buttery caramel sauce.
Ingredients
- 1 1/4 cups all-purpose flour
- 1/2 teaspoon salt
- 1/2 cup (1 stick) cold unsalted butter, cut into cubes
- 1/4 cup ice water
- 1 cup granulated sugar
- 1/4 cup water
- 1/2 cup heavy cream, warmed
- 4 tablespoons (1/2 stick) unsalted butter, cut into cubes
- 1/2 teaspoon sea salt, or to taste
- 6 medium apples (such as Honeycrisp, Gala, or Fuji), peeled, cored, and sliced
- 2 tablespoons lemon juice
- 1/4 cup granulated sugar
- 2 tablespoons all-purpose flour
- 1 teaspoon ground cinnamon
- 1/4 teaspoon ground nutmeg
- 2 tablespoons unsalted butter, melted
- Coarse sea salt, for sprinkling
- Chopped pecans or walnuts, for sprinkling
Instructions
- Combine Dry Ingredients: In a large bowl, whisk together the flour and salt.
- Cut in the Butter: Add the cold, cubed butter to the flour mixture. Using a pastry blender or your fingertips, cut the butter into the flour until the mixture resembles coarse crumbs.
- Add Ice Water: Gradually add the ice water, one tablespoon at a time, mixing gently after each addition. Stop adding water when the dough just comes together.
- Form the Dough: Gently gather the dough into a ball. Flatten it into a disc, wrap it tightly in plastic wrap, and refrigerate for at least 30 minutes.
- Roll Out the Dough: On a lightly floured surface, roll out the dough into a 12-inch circle.
- Transfer to Tart Pan: Carefully transfer the rolled-out dough to a 9-inch tart pan with a removable bottom. Gently press the dough into the bottom and up the sides of the pan.
- Trim and Crimp the Edges: Trim any excess dough from the edges of the pan. Crimp the edges of the crust using a fork or your fingers to create a decorative border.
- Pre-bake the Crust (Blind Bake): Preheat your oven to 375°F (190°C). Line the crust with parchment paper and fill it with pie weights or dried beans. Bake for 15 minutes.
- Remove Weights and Bake Further: Remove the parchment paper and pie weights. Return the crust to the oven and bake for another 10-15 minutes, or until lightly golden brown.
- Cool the Crust: Let the crust cool completely in the tart pan before adding the filling.
- Combine Sugar and Water: In a medium saucepan, combine the sugar and water. Stir to moisten the sugar.
- Cook the Caramel: Place the saucepan over medium heat. Bring the mixture to a boil and cook, without stirring, until the sugar turns a deep amber color (8-10 minutes). Swirl the pan gently if needed.
- Add Heavy Cream: Carefully remove the saucepan from the heat. Slowly pour in the warmed heavy cream.
- Add Butter and Salt: Add the cubed butter and sea salt to the caramel. Stir until the butter is melted and the caramel is smooth and glossy.
- Cool Slightly: Let the caramel cool slightly before pouring it over the apples.
- Prepare the Apples: Peel, core, and slice the apples.
- Toss with Lemon Juice: In a large bowl, toss the apple slices with the lemon juice.
- Combine Dry Ingredients: In a separate small bowl, whisk together the sugar, flour, cinnamon, and nutmeg.
- Coat the Apples: Sprinkle the sugar mixture over the apples and toss to coat evenly.
- Melted Butter: Drizzle the melted butter over the apples and toss again.
- Arrange Apples in Crust: Arrange the apple slices in the pre-baked tart crust.
- Pour Caramel Over Apples: Pour the slightly cooled salted caramel over the apples, making sure to distribute it evenly.
- Bake the Tart: Preheat your oven to 350°F (175°C). Bake the tart for 45-55 minutes, or until the apples are tender and the caramel is bubbly and golden brown. Tent with foil if the crust browns too quickly.
- Cool the Tart: Let the tart cool completely on a wire rack before serving.
- Optional Toppings: Before serving, sprinkle the tart with coarse sea salt and chopped pecans or walnuts, if desired.
Notes
- Use cold butter for a flaky crust.
- Don’t overmix the dough.
- Chill the dough for at least 30 minutes.
- Watch the caramel carefully to prevent burning.
- Use a variety of apples for a more complex flavor.
- Serve at room temperature or slightly warm.
- Serve with vanilla ice cream or whipped cream, if desired.
- Store leftovers in the refrigerator for up to 3 days.
- Reheat in the oven at 300°F (150°C) for a few minutes.